
If you love outerwear as much as me, be sure to check out this short film showing the construction and repair of Barbour jackets!
jackets
RAIN
Comment


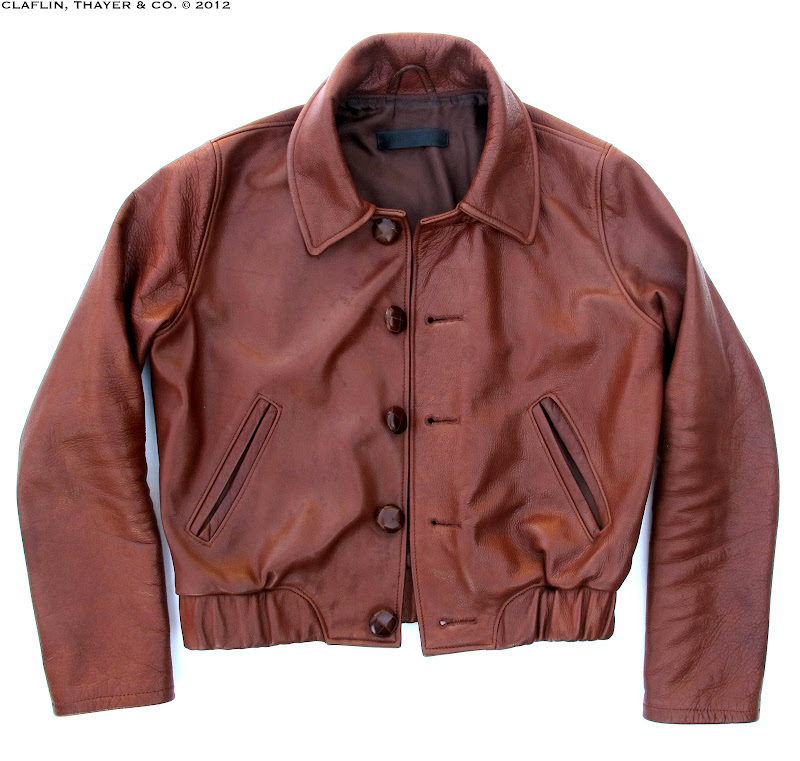
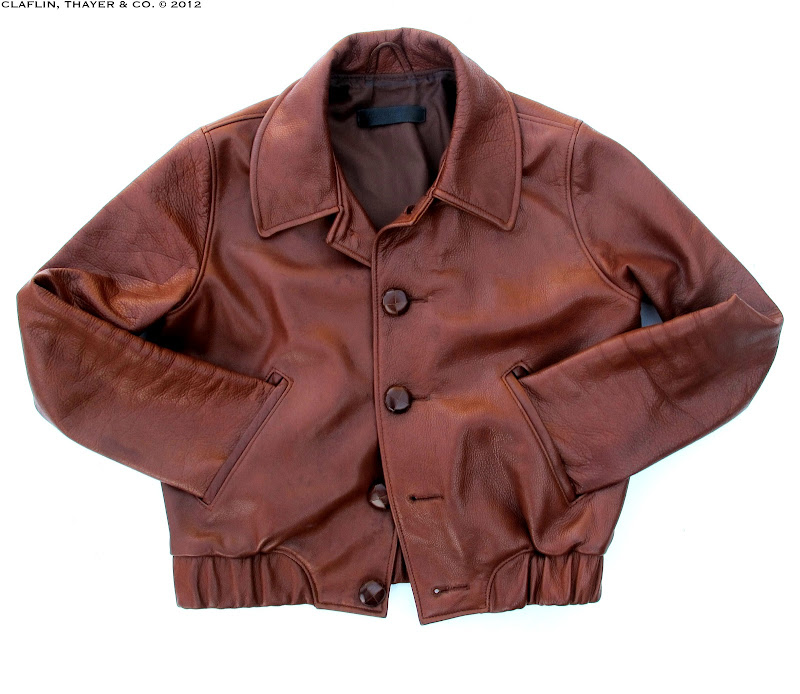
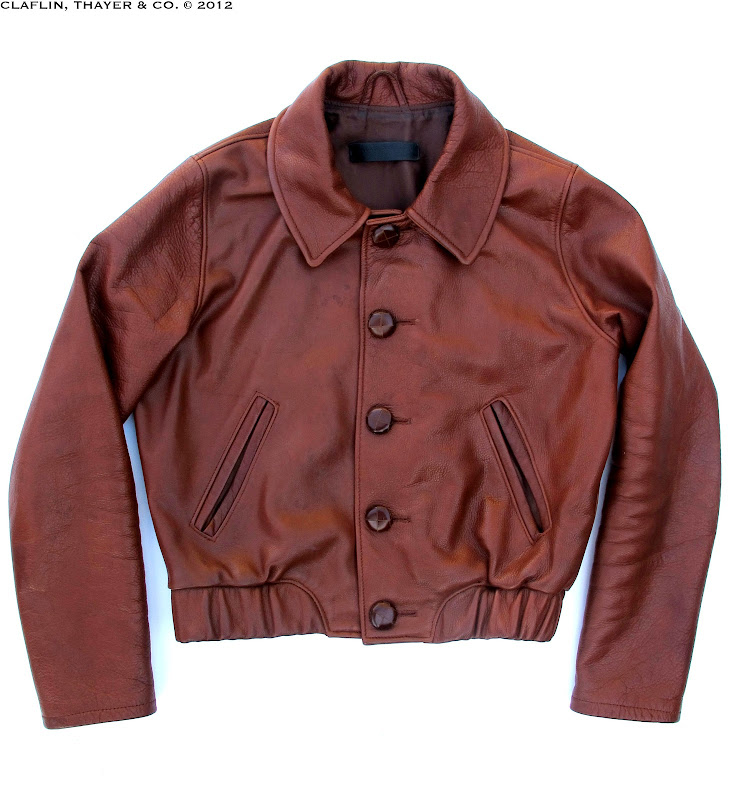
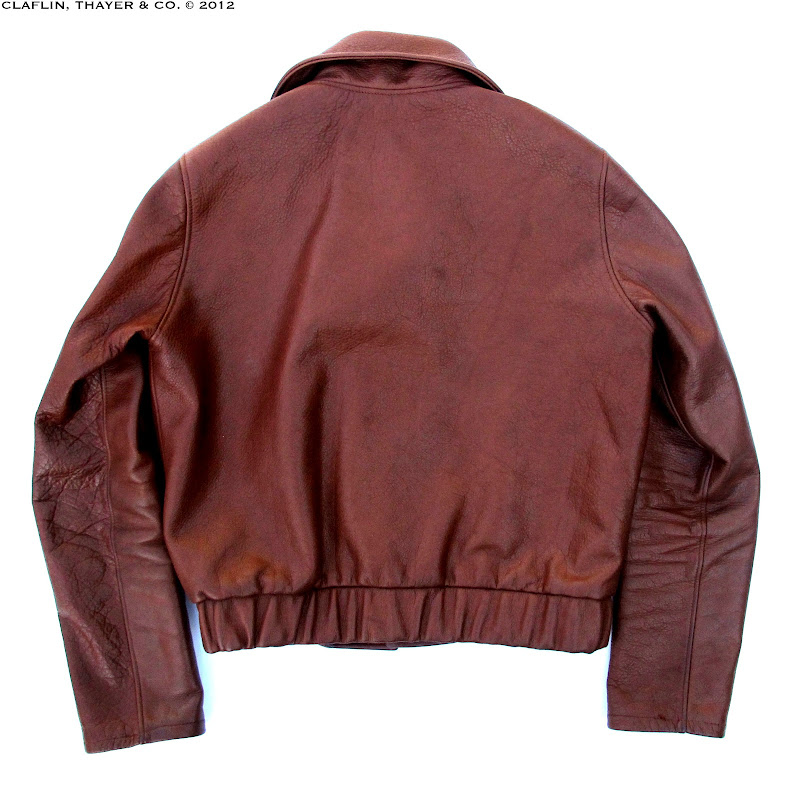
RUSTY LEATHER JACKET
5 Comments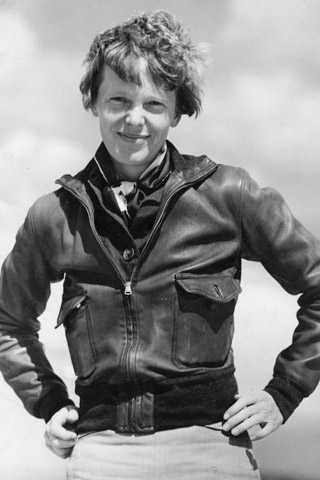
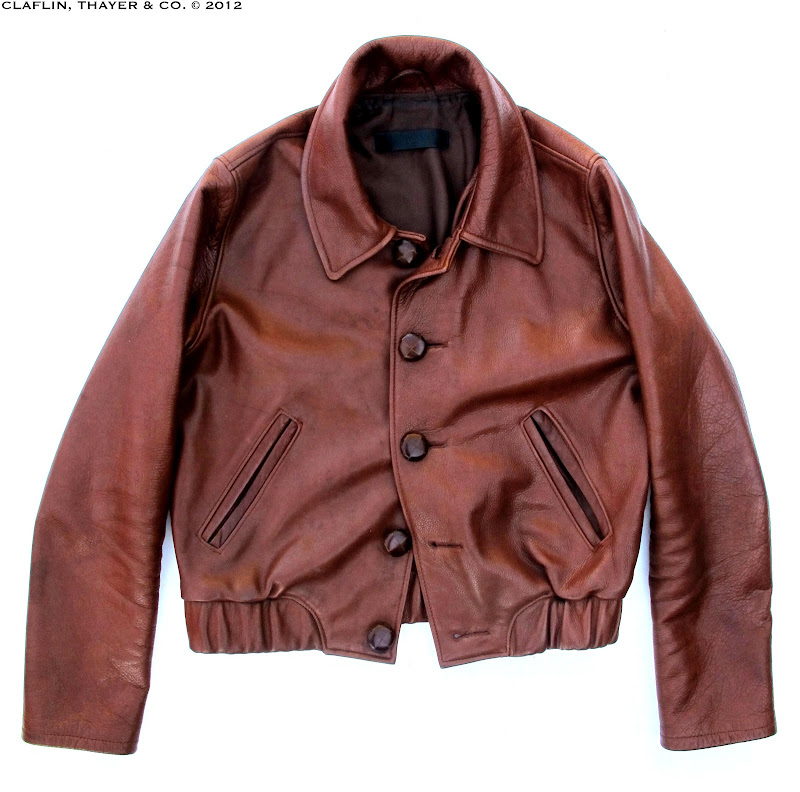
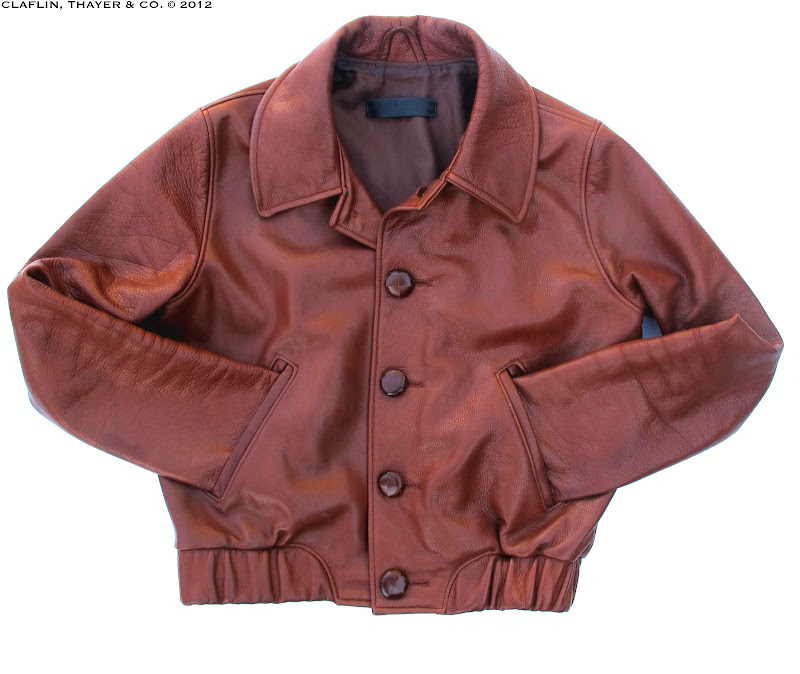
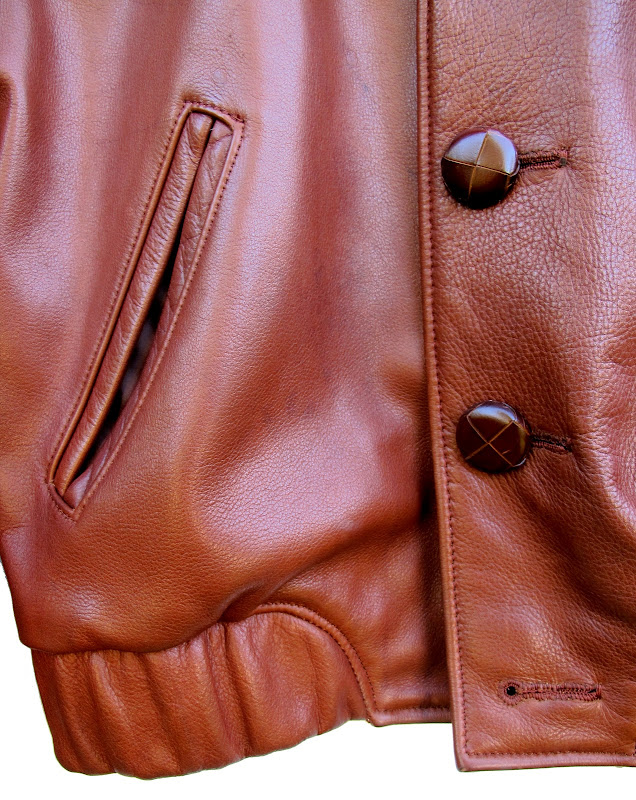
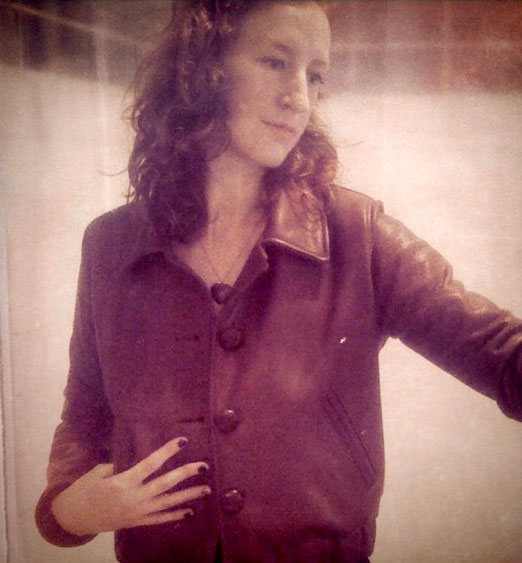
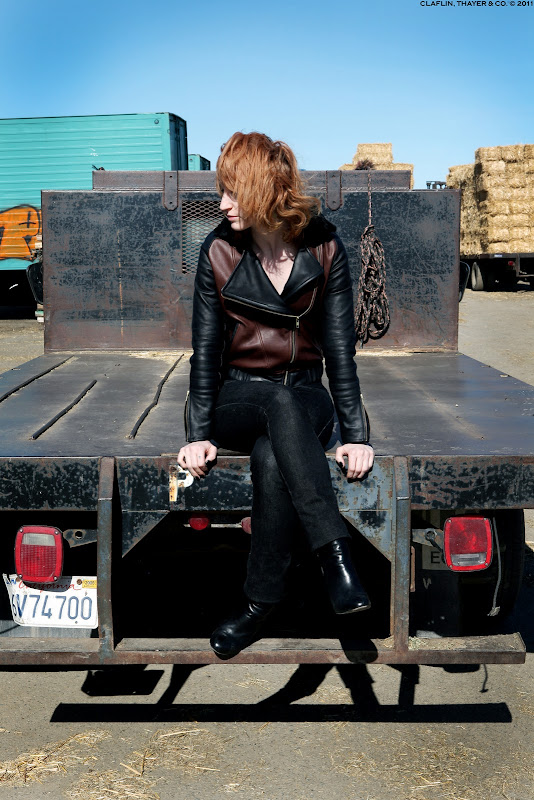
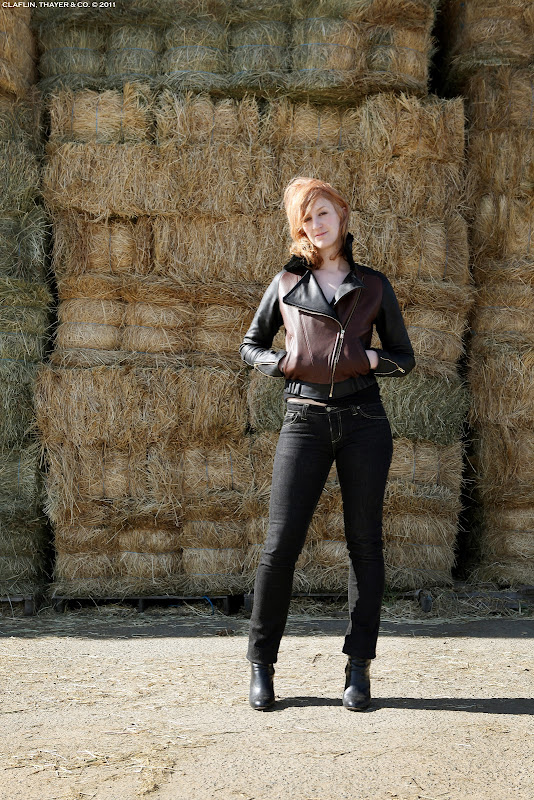
 I made this jacket months ago and just never got around to posting it. Now I've worn it through the rain, at the bar, and spilled coffee and olive oil on it. So it's already thrashed, but leather gets better with age, so here it is. I used the same basic shape as the LETTERMAN JACKET but made some slight alterations, like the curved hem at the waist and a regular convertible collar. I've always loved the iconic aviator jackets Amelia Earhart wore - she was such a cool lady - and wanted to make something reminiscent of them to wear as an everyday basic. I picked up this beautiful rusty brown cowside and found matching leather buttons. The jacket is super simple and has become a regular staple in my wardrobe.
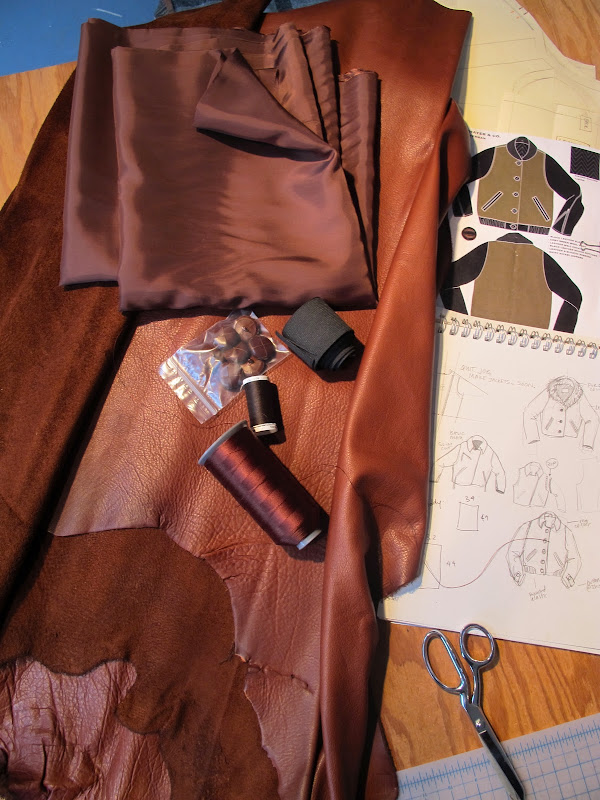
Leather, lining, trims, sketches, pattern.
 Sewing the front.
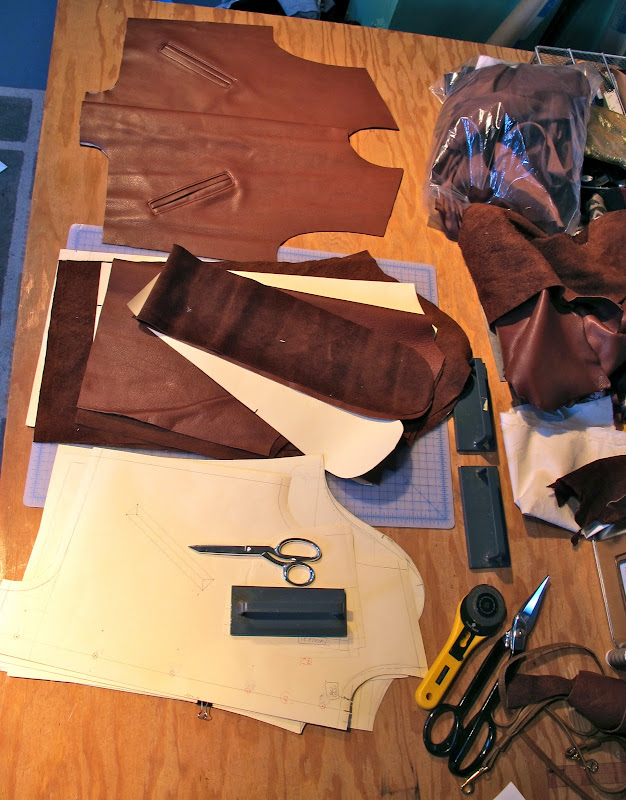 Sewing the collar down and starting the lining.
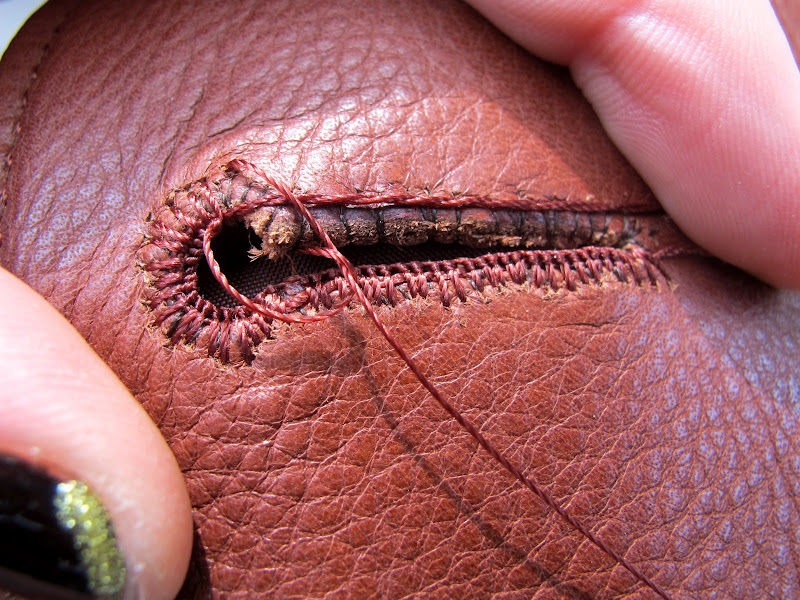
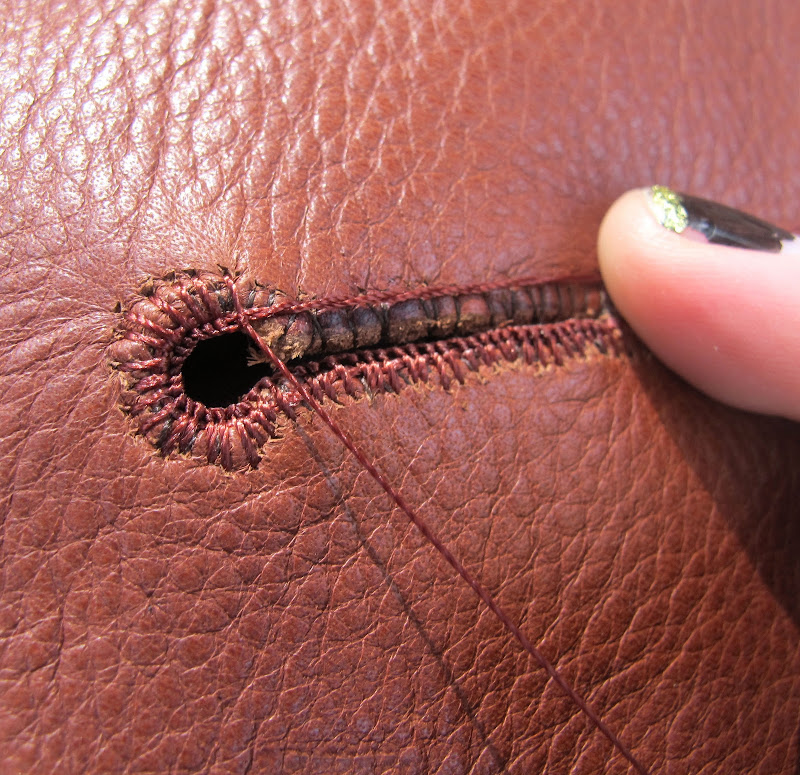
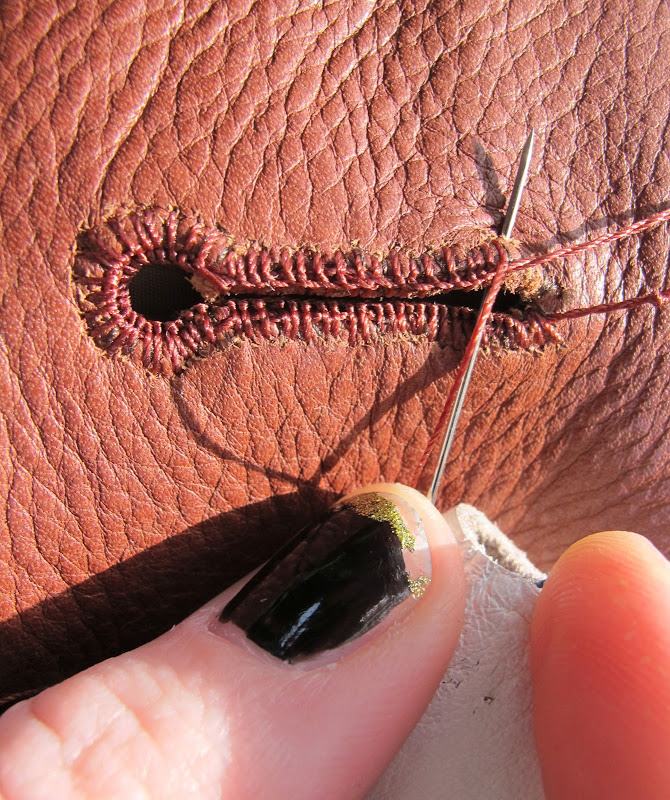
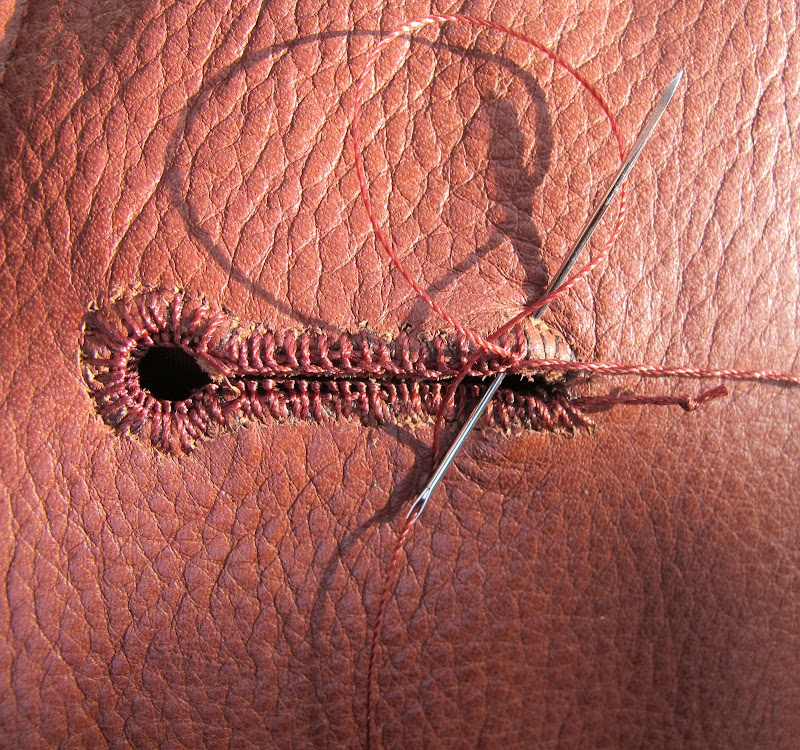
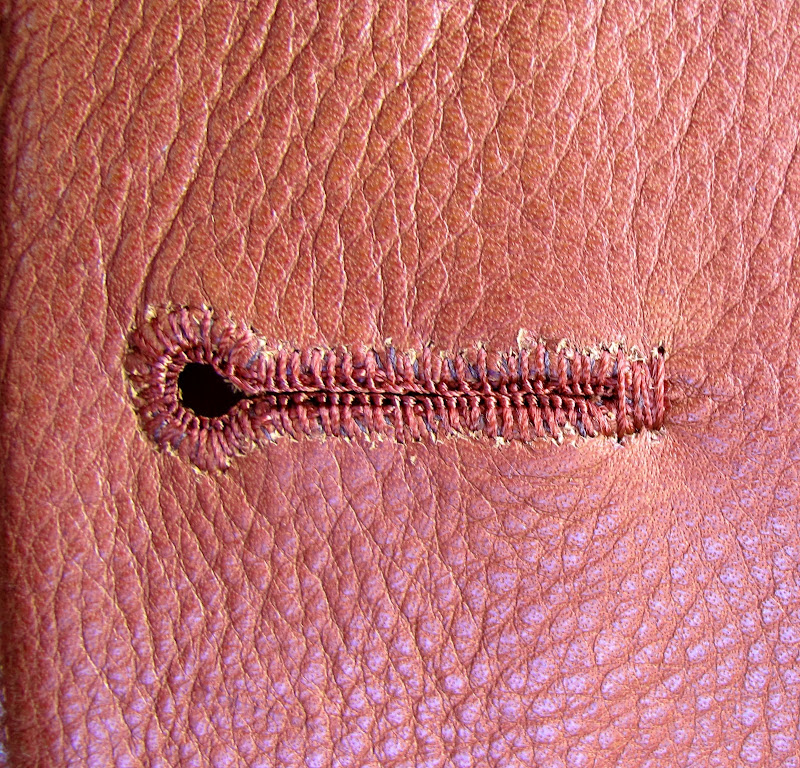
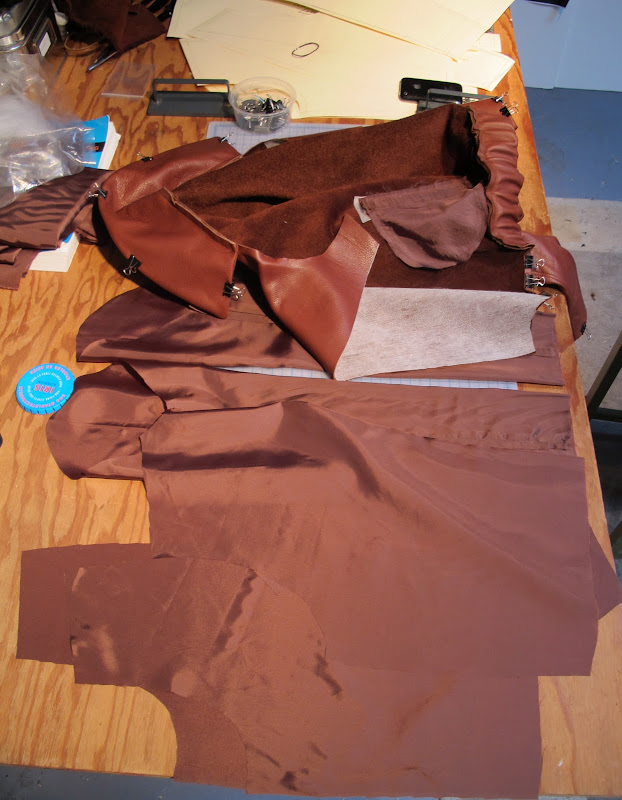 I did hand-finished button holes again on this jacket - I really like making them because they're so much stronger and nicer than machine holes. They take a while but it's a good project to work on in front of the TV with a glass of wine (and a good light). You can kind of see the process here: First step is to make a slit and punch a hole where the buttonhole will be and then overcast the whole thing like this:
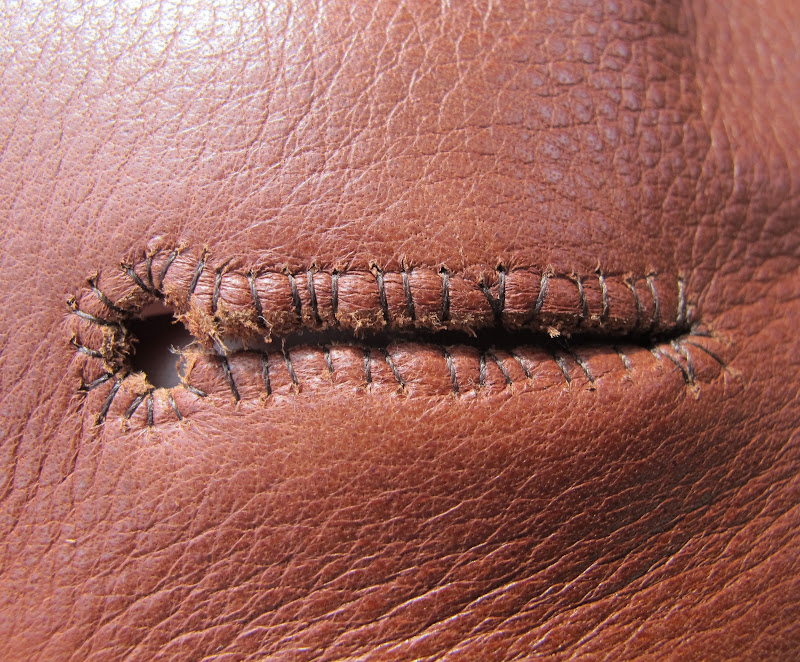 Then you work around the entire thing with a small cord, covering it with a buttonhole stitch - it makes a tiny raised purl that sits on top of the stitch and looks nice and clean.
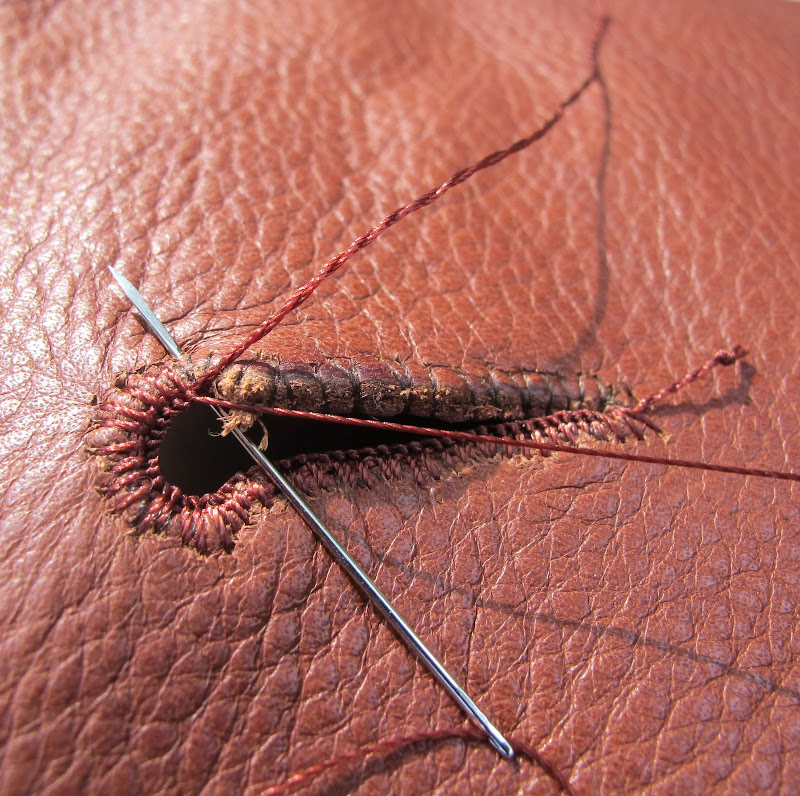
 I actually got careless and totally screwed up on cutting the inside facing of the jacket. It's a little rumply in the front as a result, but not enough to really bother me. It's very true what they say though - always DOUBLE CHECK before cutting. Lesson learned.
Finished jacket:
LOOKING SHARP
Comment
Cool dude, cool jacket. He wears it well. Pic from Painted Bird.
BLUE JACKET
Comment
Blue Acne jacket from Vanessa Jackman's blog. Love that smack-you-in-the-face color.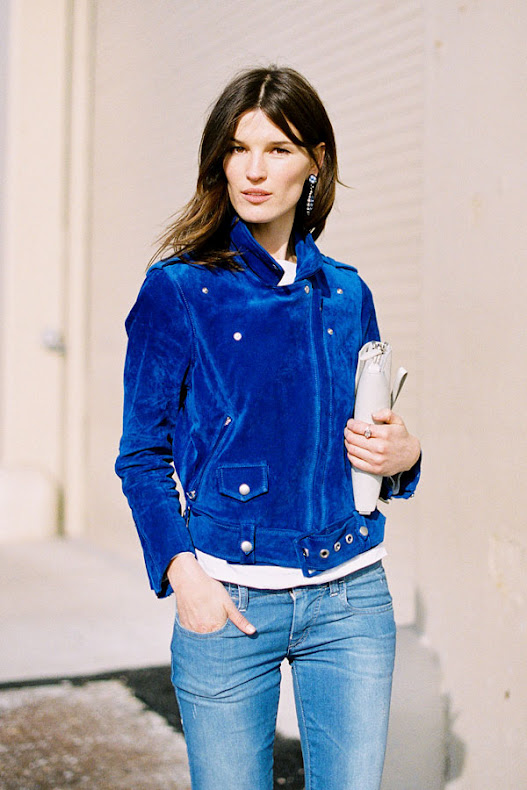
MORE SILVER
Comment
Fuck yeah, Rick Derringer. I guess I'm feeling the silver leather this week.
SILVER & BLACK
Comment
UNIONMADE LOVE
3 Comments
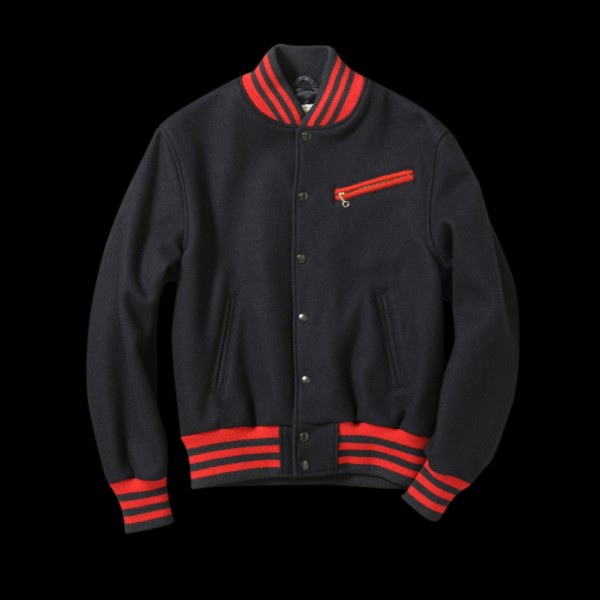
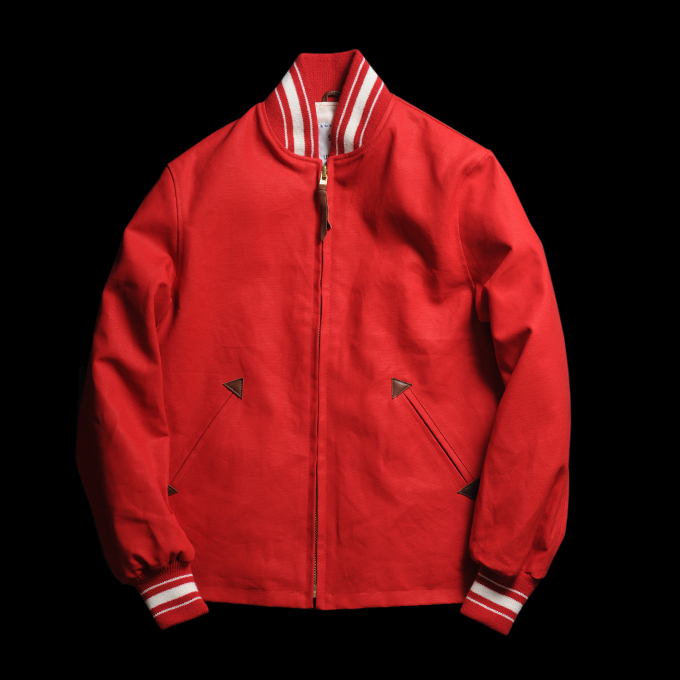
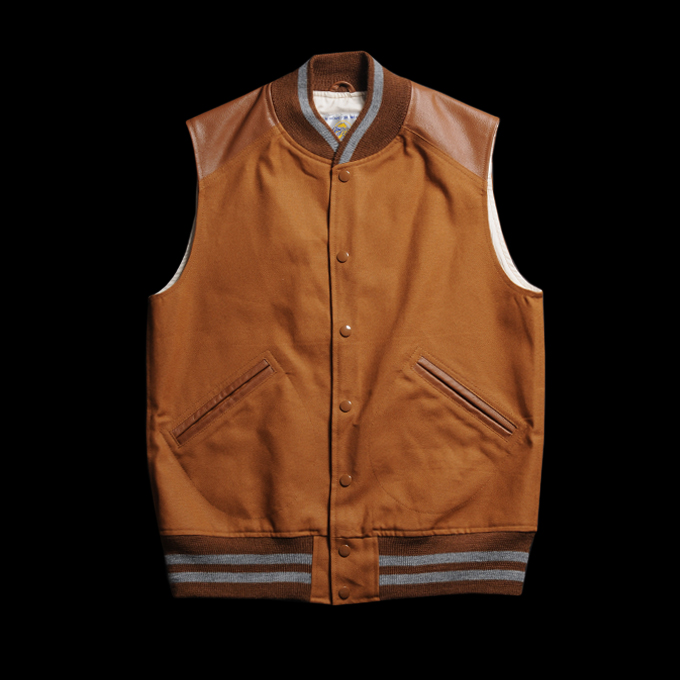
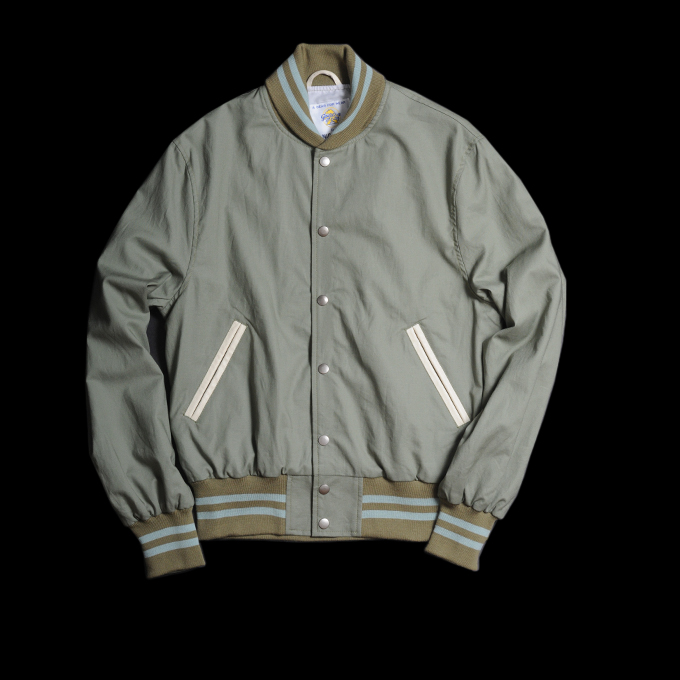
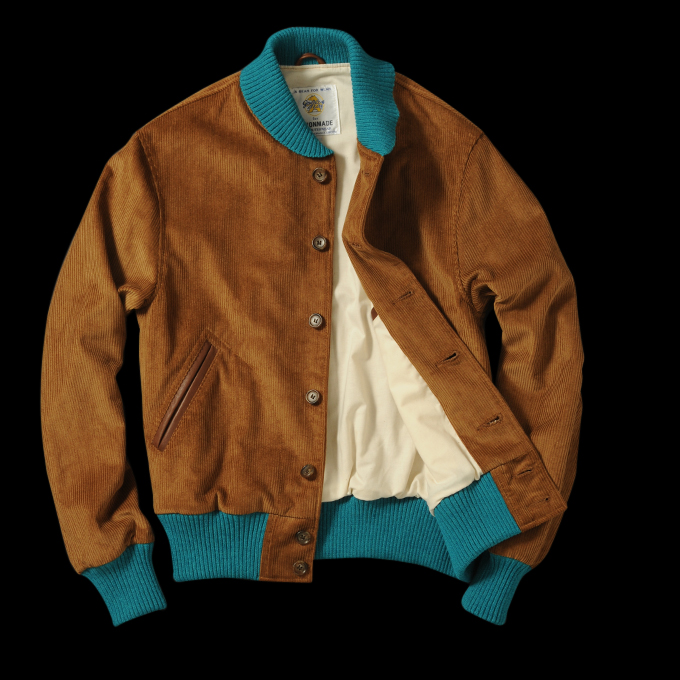
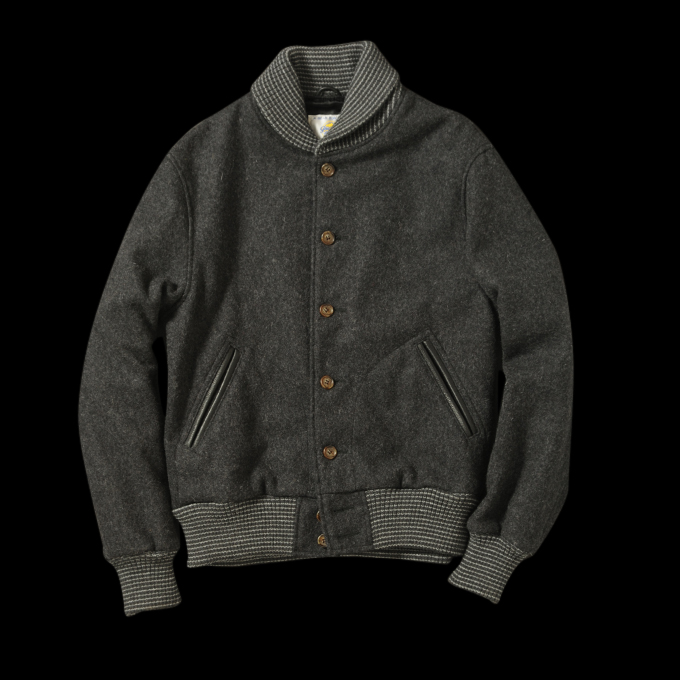
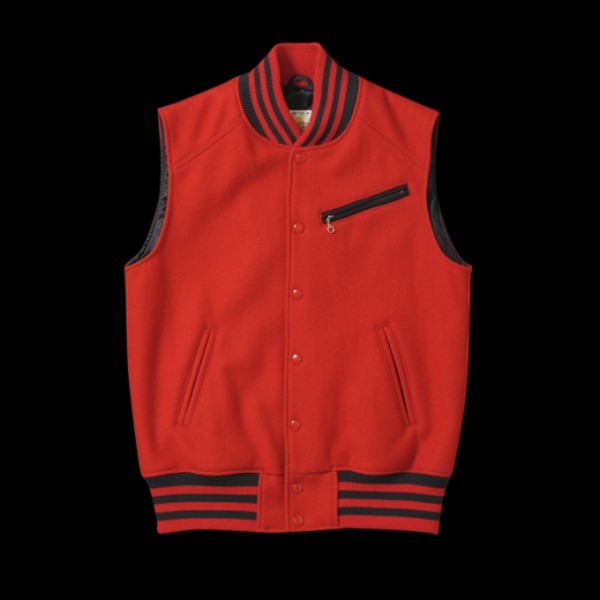
Oooohhhh boy. Have not had jacket love like this in a long time. UNIONMADE collaborated with Golden Bear Sportswear, a family-owned San Francisco company since 1922, originally know for their longshorman jackets, to create the styles below. They are pretty much perfect in my opinion - simple, sexless, and straightforward. Even better, they are quite affordable. Just hire me already...geez! You can shop the whole collection HERE.

1924 BRITISH EXPEDITION TO MT EVEREST
Comment
Goddamn, look how tough these guy are in their Harris Tweed Jackets and scarves. That must have been a rough trip. Photo from John Noel Photographic Collection
Photo from John Noel Photographic Collection
VISVIM "ORION" COAT
3 Comments

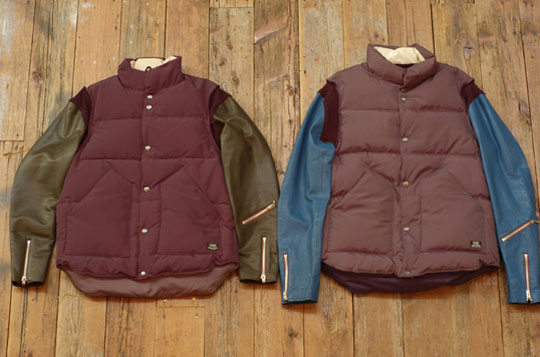
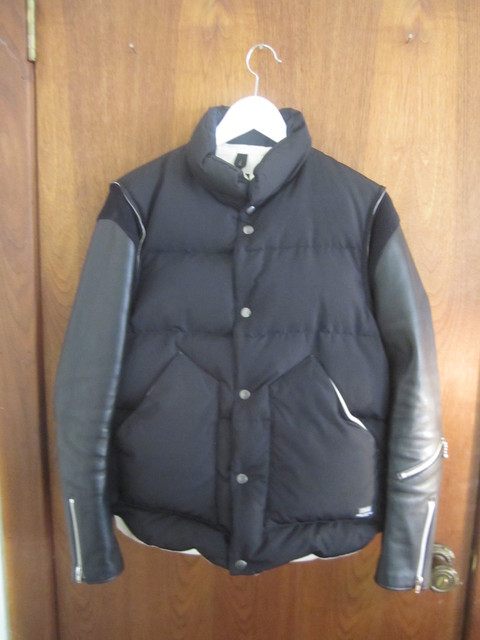
UNDERCOVER PUFFERS
Comment
More totally radical jackets from Japanese label UNDERCOVER - always mixing and matching various elements into a cool mishmash of combos. Here we have some sleeping bag puffer vests with leather motorcycle jacket sleeves.

IN THE REDWOODS
3 Comments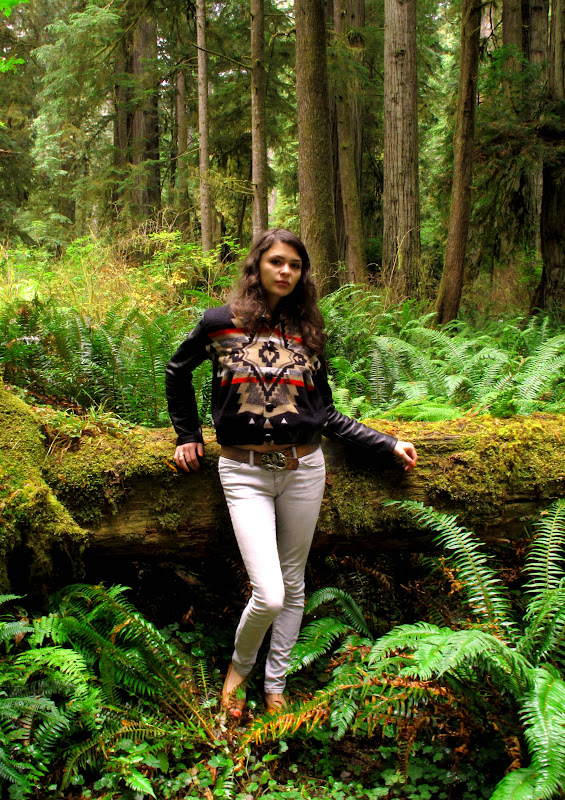


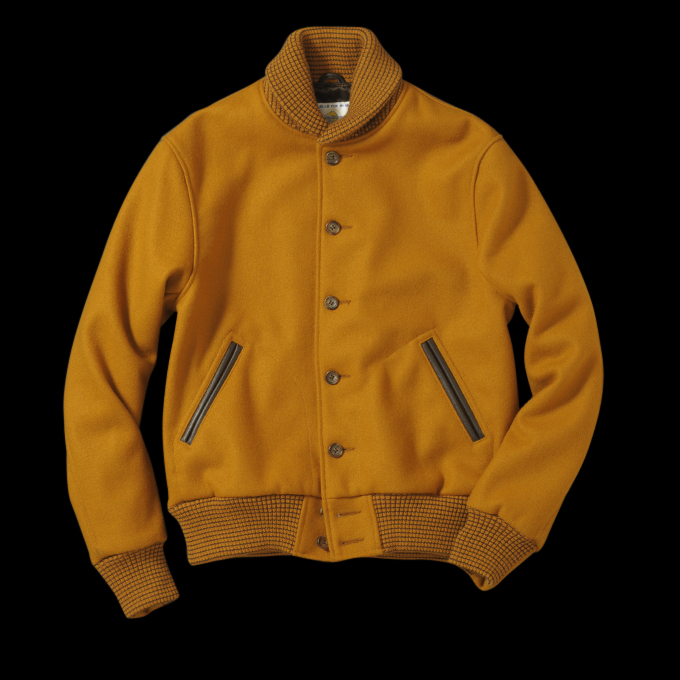
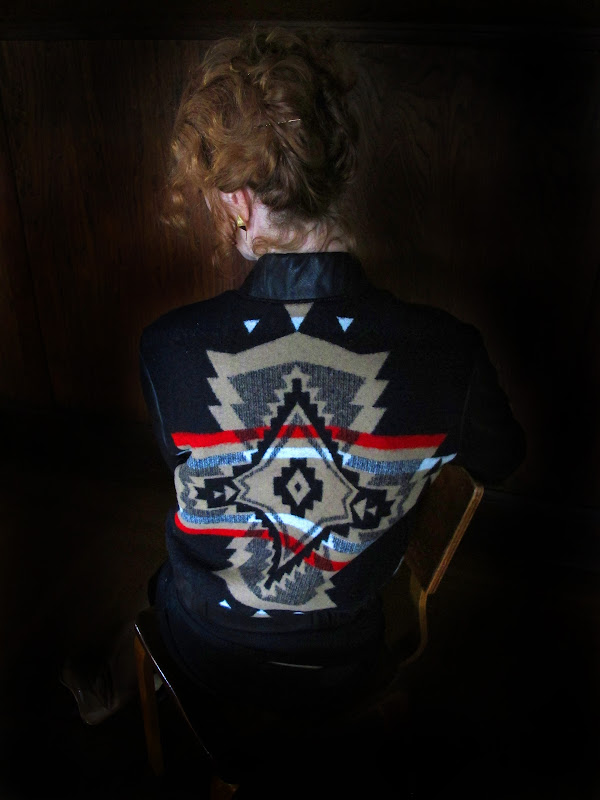
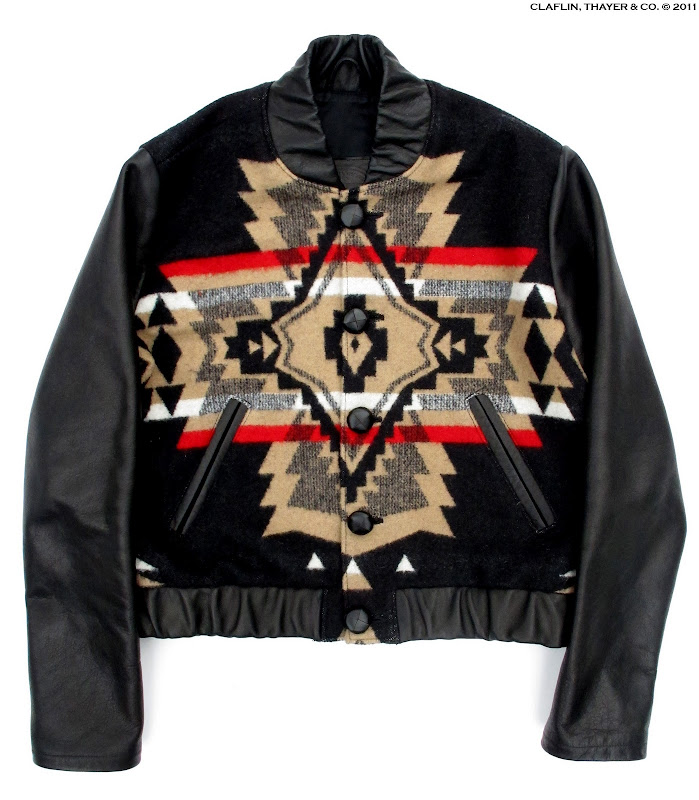
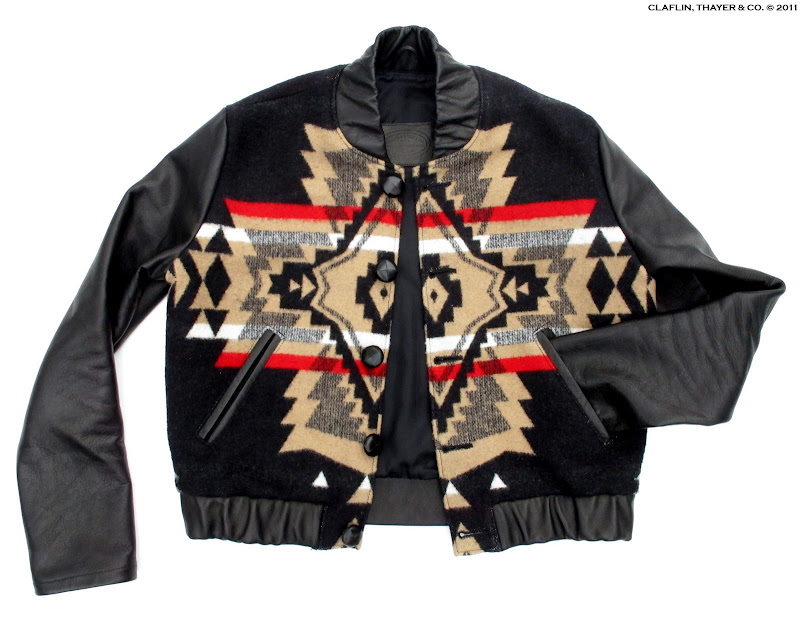
PENDELTON WOOL x LEATHER JACKET
10 Comments
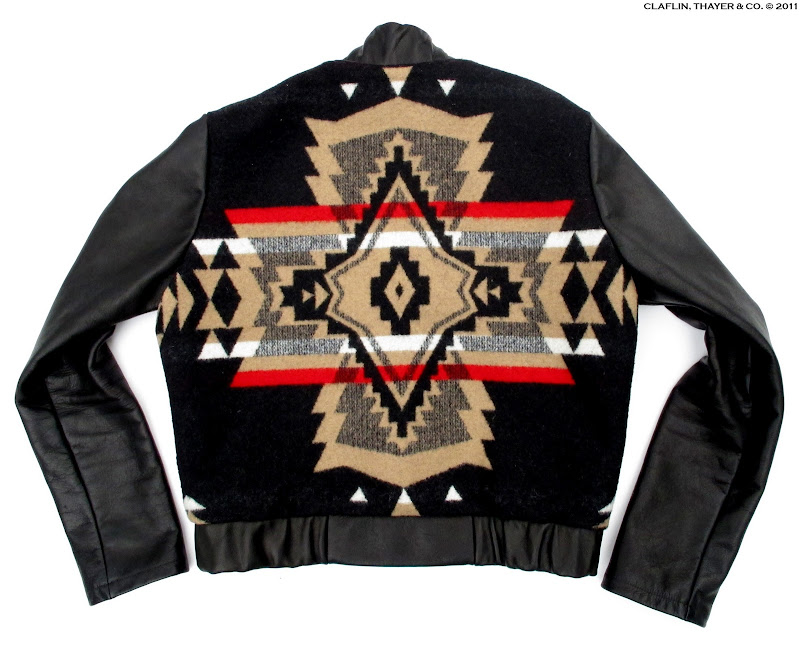
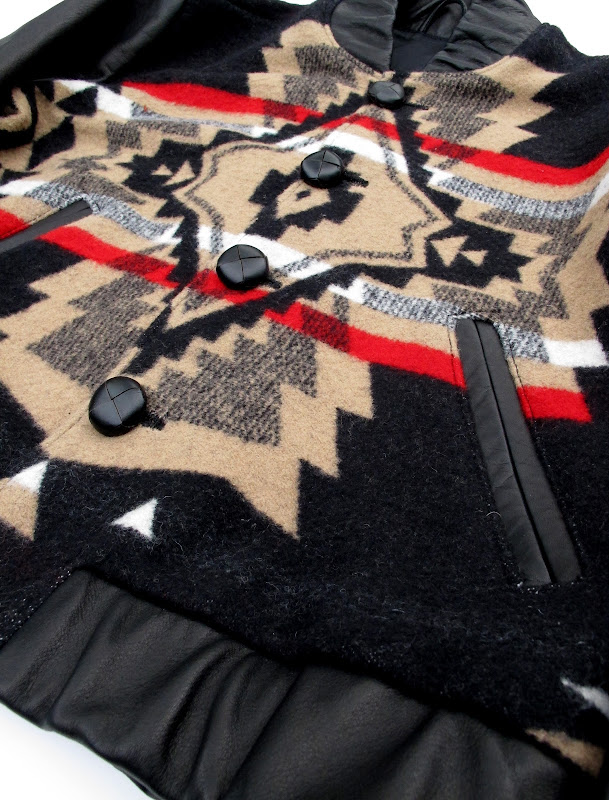
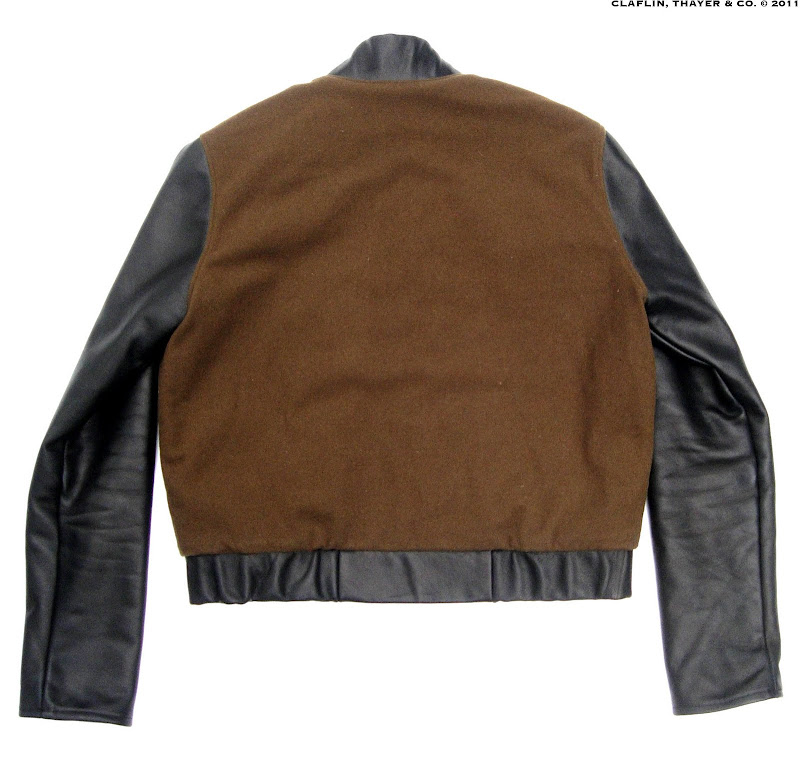
New jacket - Pendelton Overall wool with black leather sleeves and trim.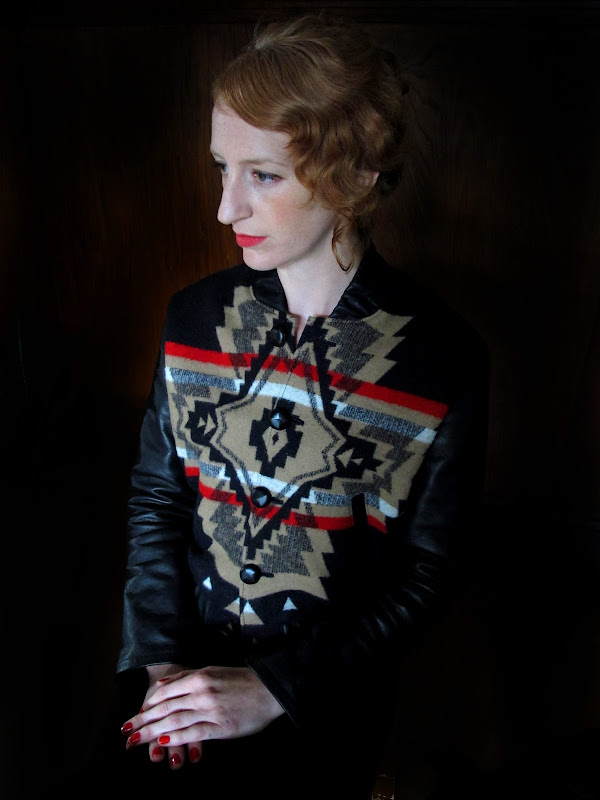
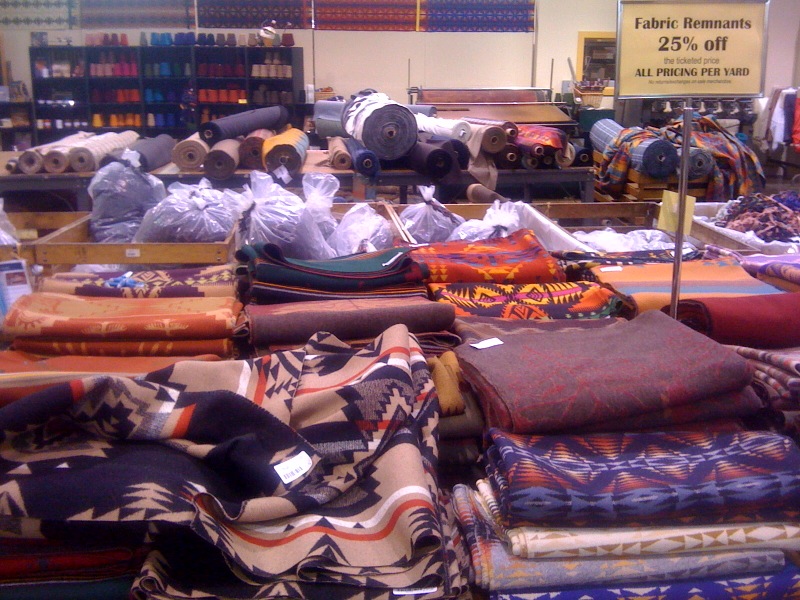
 I picked up this great piece of "Overall" fabric at the Pendelton mill store last time I was in Portland. It's 64" wide with a large 26" bold graphic repeat, 82% pure virgin wool, 18% cotton. I found a remanent that was exactly one repeat and I instantly thought how well it would work cut into the simple Letterman-style pattern of my last jacket. Here's my soon-to-be purchased fabric piece below.
 These pics are from the Pendelton website, but I think they give a pretty clear sense of how big the repeat is.
 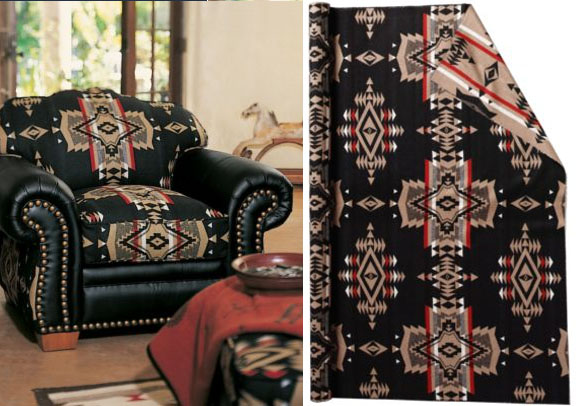 It took a bit of puzzle piecing to figure out the best way to cut this so it would line up perfectly.
 In the end, there is one clear repeat on the front and back of the jacket. I couldn't believe how perfectly the fabric design fit into my pattern pieces, total luck here.

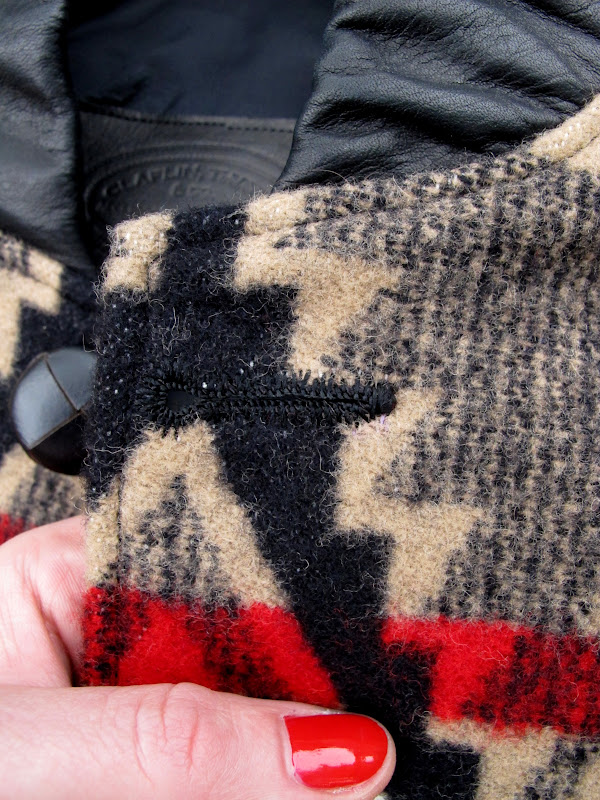
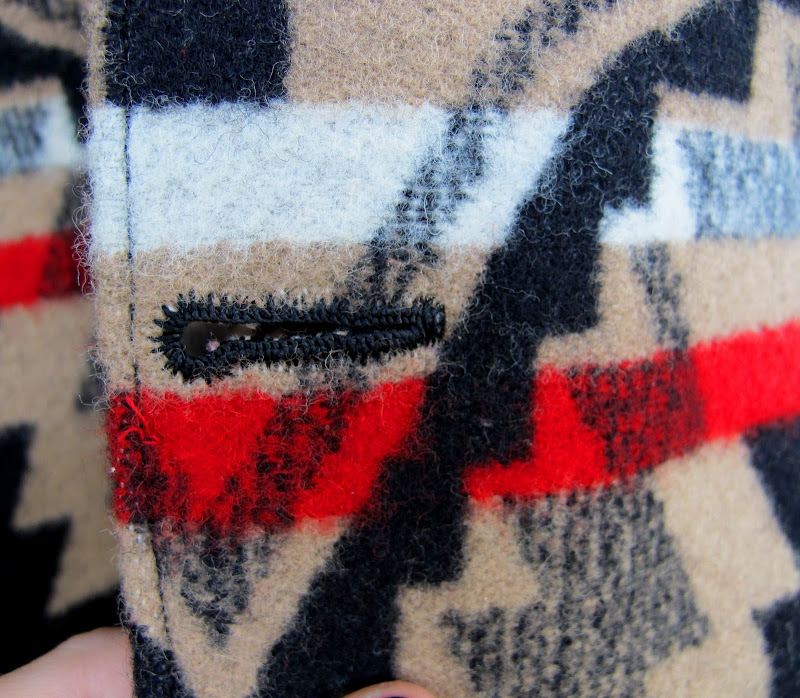
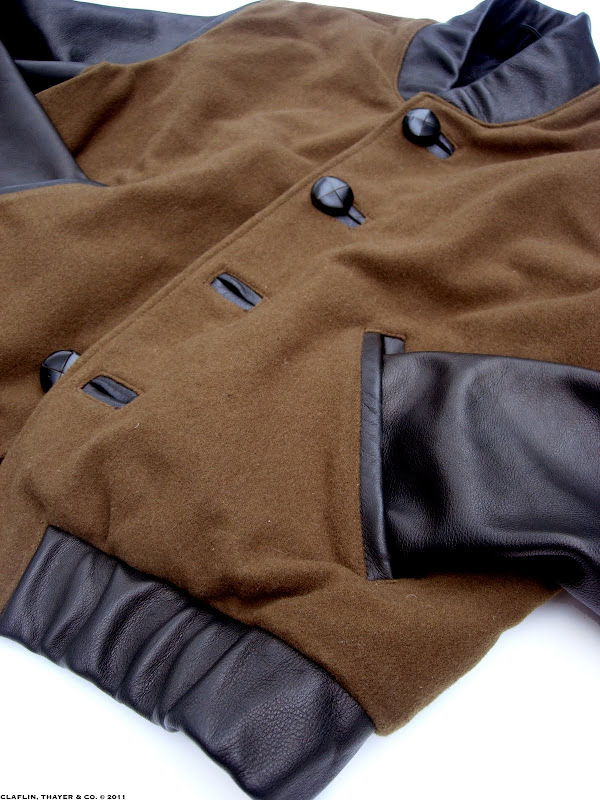
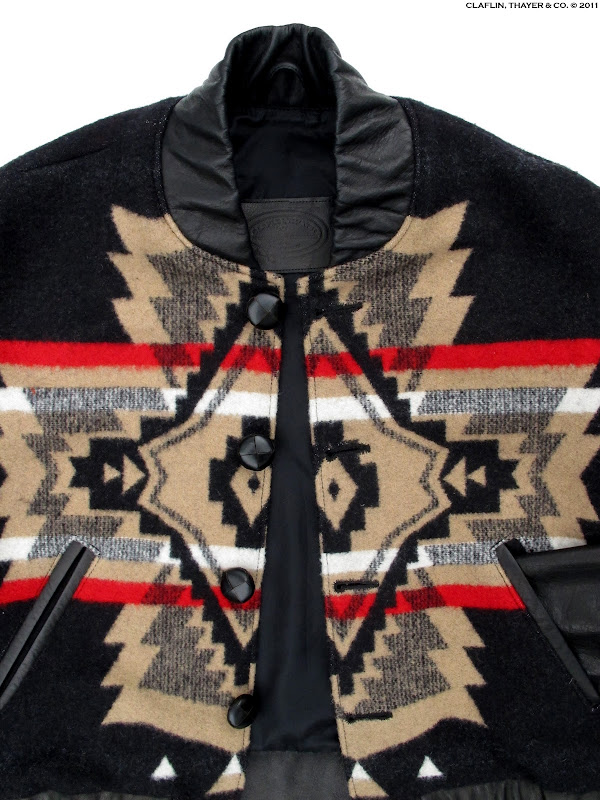 My biggest challenge for this jacket was making button holes. I don't have a buttonhole machine and I wanted something really nice for this style. So I took on the project of learning to make handmade buttonholes the old-fashion way. Below images are scanned from a 1960 booklet called How to Make Buttonholes which I found on the totally awesome and helpful tailoring blog that I am obsessed with: TUTTOFATTOAMANO.
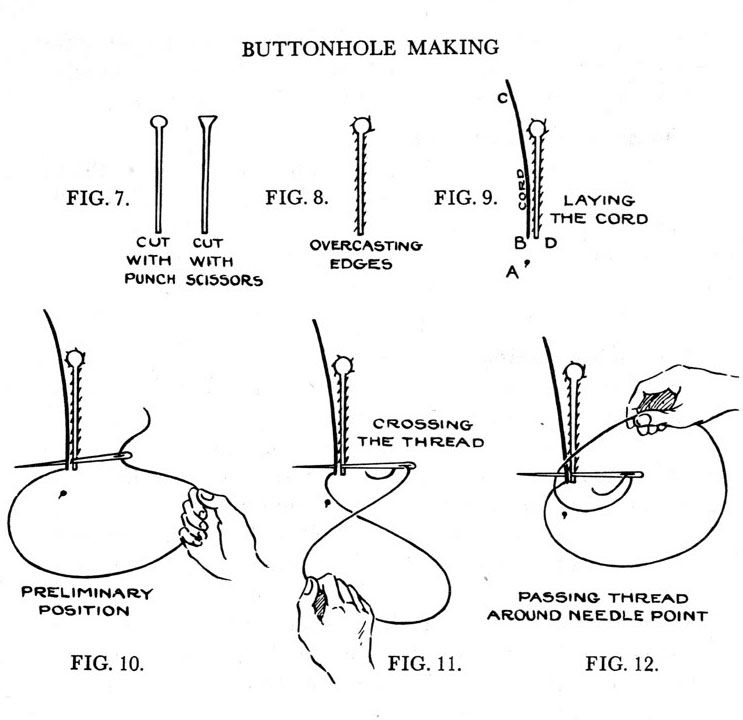
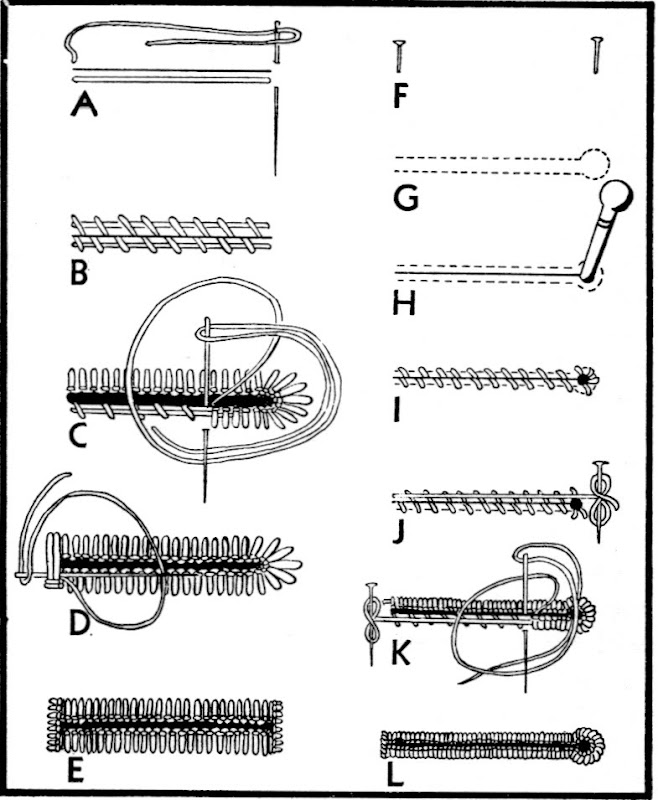 This kind of buttonhole basically involves cutting a slit in your fabric, overcasting the opening, laying a cord down, and purl-stitching around the entire thing. I made about 15 practice holes before cutting into the actual fabric, but it would take years to really perfect this kind of hand technique. In addition, this fabric was a real bitch to work with as it had the tendency to fray and easily pull apart. The finished holes came out decent and I'm excited to use this technique more and improve with practice. Click to see bigger.
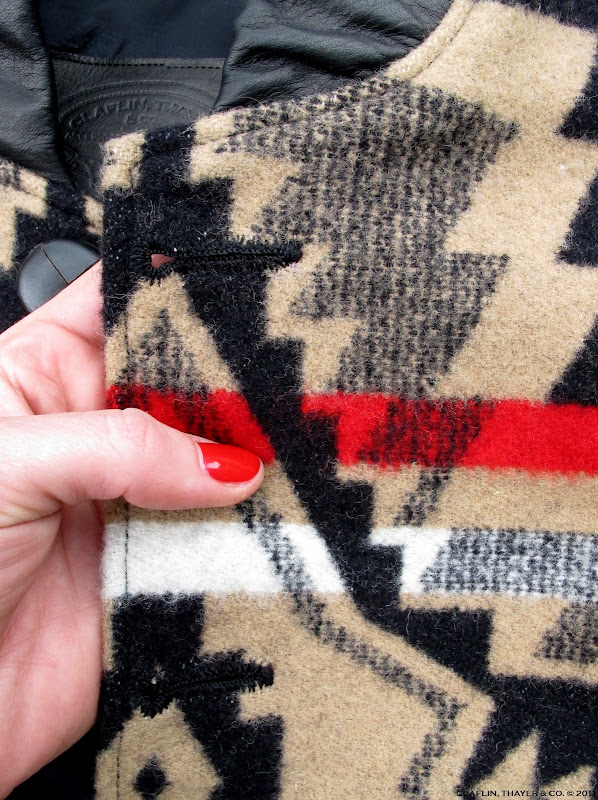
 With the Fall Equinox having just passed and the weather quickly changing, I'm gearing up for lots of new Fall/Winter styles. I need something to keep warm while I'm working...
I picked up this great piece of "Overall" fabric at the Pendelton mill store last time I was in Portland. It's 64" wide with a large 26" bold graphic repeat, 82% pure virgin wool, 18% cotton. I found a remanent that was exactly one repeat and I instantly thought how well it would work cut into the simple Letterman-style pattern of my last jacket. Here's my soon-to-be purchased fabric piece below.These pics are from the Pendelton website, but I think they give a pretty clear sense of how big the repeat is. It took a bit of puzzle piecing to figure out the best way to cut this so it would line up perfectly.In the end, there is one clear repeat on the front and back of the jacket. I couldn't believe how perfectly the fabric design fit into my pattern pieces, total luck here.My biggest challenge for this jacket was making button holes. I don't have a buttonhole machine and I wanted something really nice for this style. So I took on the project of learning to make handmade buttonholes the old-fashion way. Below images are scanned from a 1960 booklet called How to Make Buttonholes which I found on the totally awesome and helpful tailoring blog that I am obsessed with: TUTTOFATTOAMANO.This kind of buttonhole basically involves cutting a slit in your fabric, overcasting the opening, laying a cord down, and purl-stitching around the entire thing. I made about 15 practice holes before cutting into the actual fabric, but it would take years to really perfect this kind of hand technique. In addition, this fabric was a real bitch to work with as it had the tendency to fray and easily pull apart. The finished holes came out decent and I'm excited to use this technique more and improve with practice. Click to see bigger.With the Fall Equinox having just passed and the weather quickly changing, I'm gearing up for lots of new Fall/Winter styles. I need something to keep warm while I'm working...
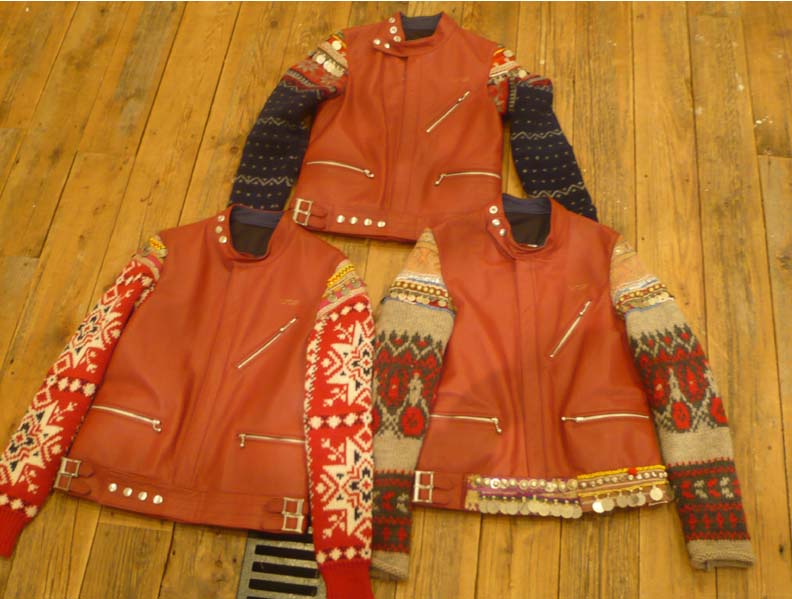
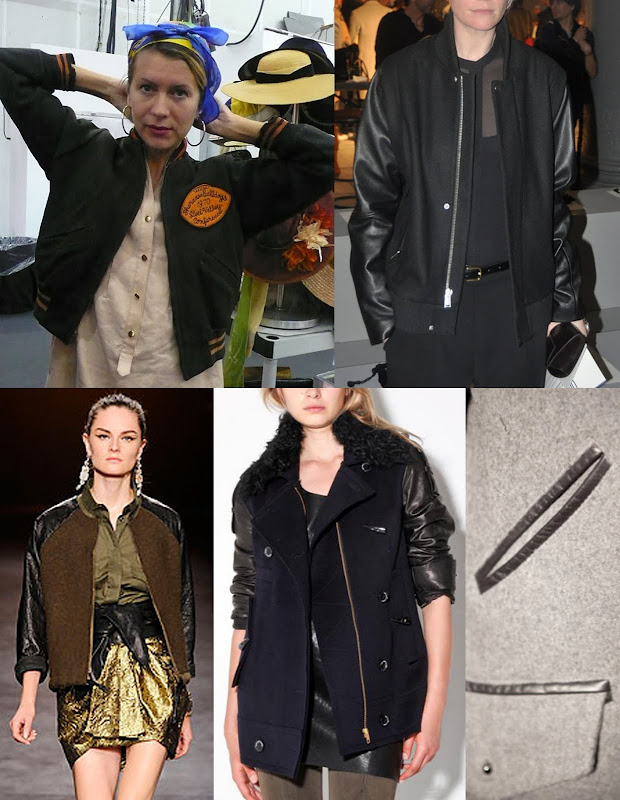
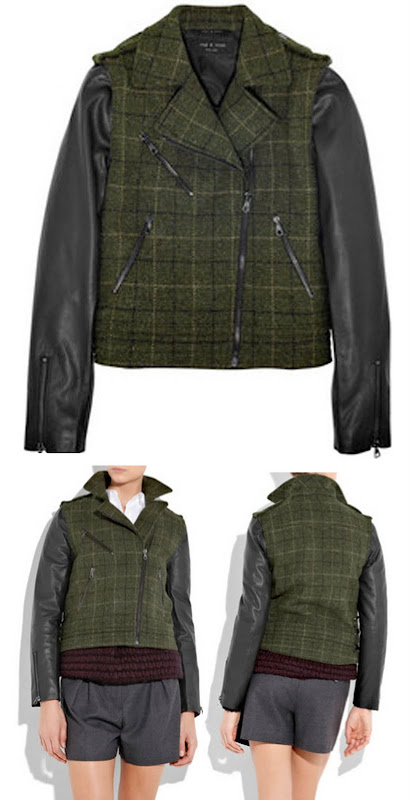
JACKET INSPIRATION - GRAPHIC PATTERN & LEATHER
2 Comments
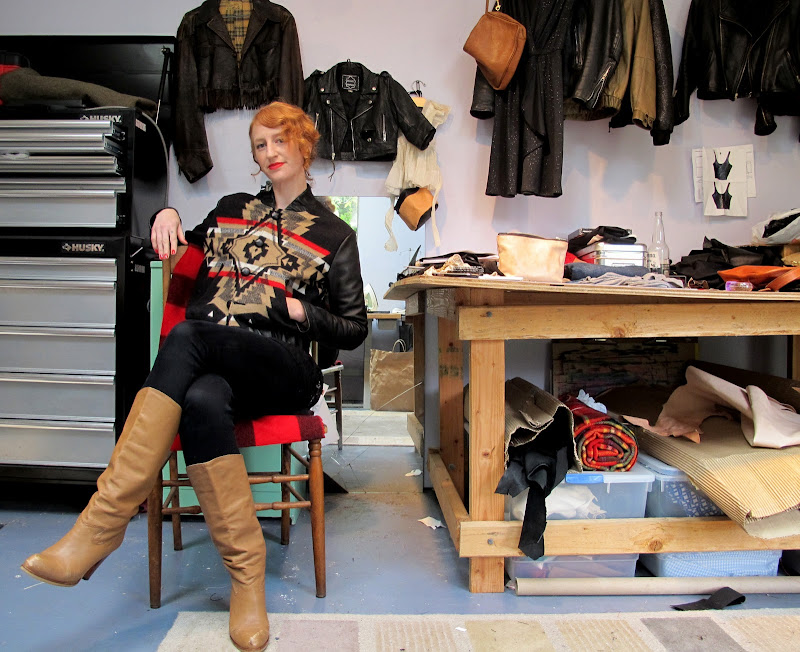
I've had these jackets by Jun Takahashi for Undercover on my mind ever since I saw them. I love the unexpected mix of classic biker styling and leather with wool fair isle sweaters. Hoping to have my current jacket finished by this weekend, stay tuned for pics.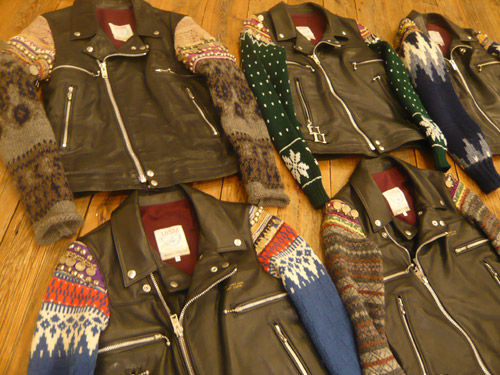

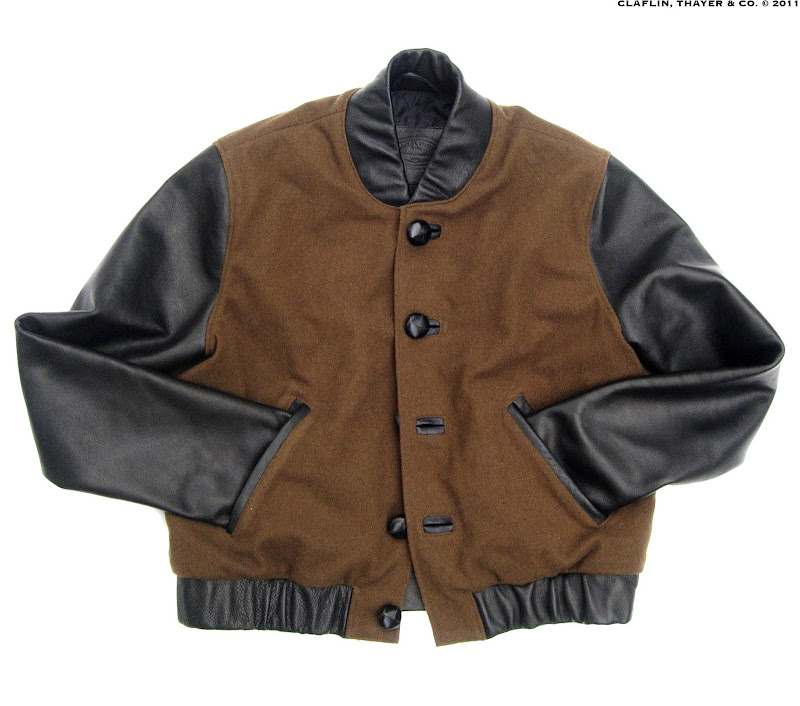
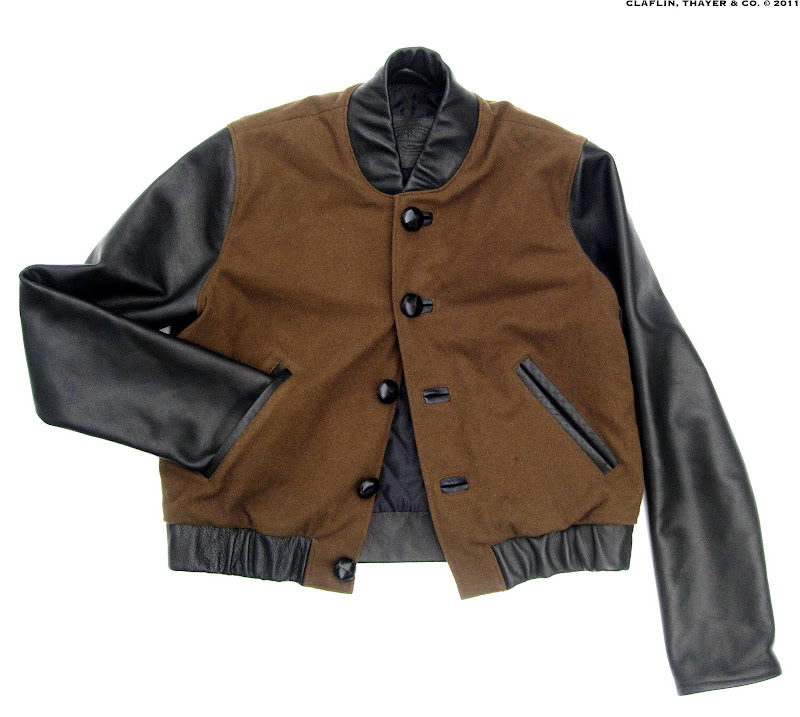
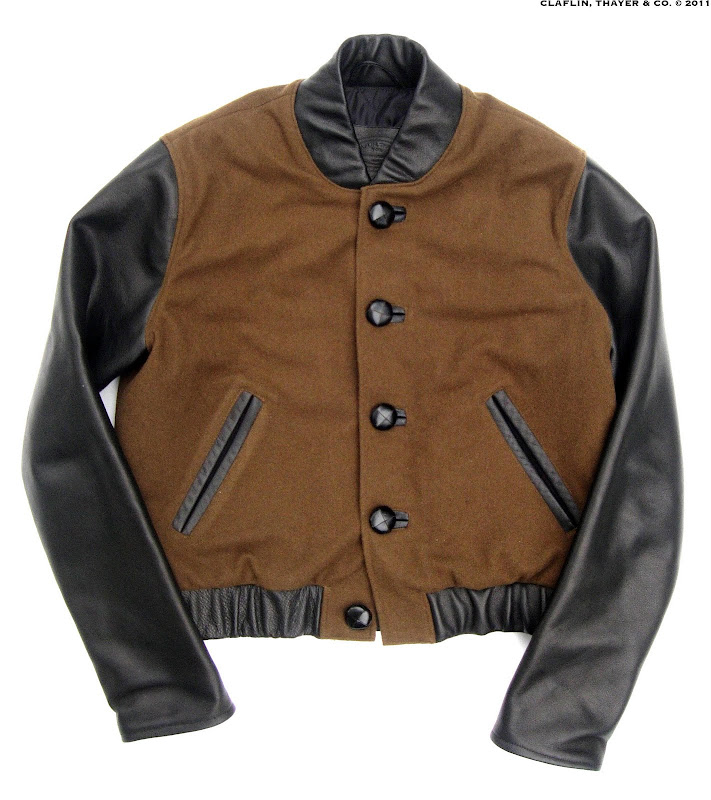
JACKET #3
8 Comments
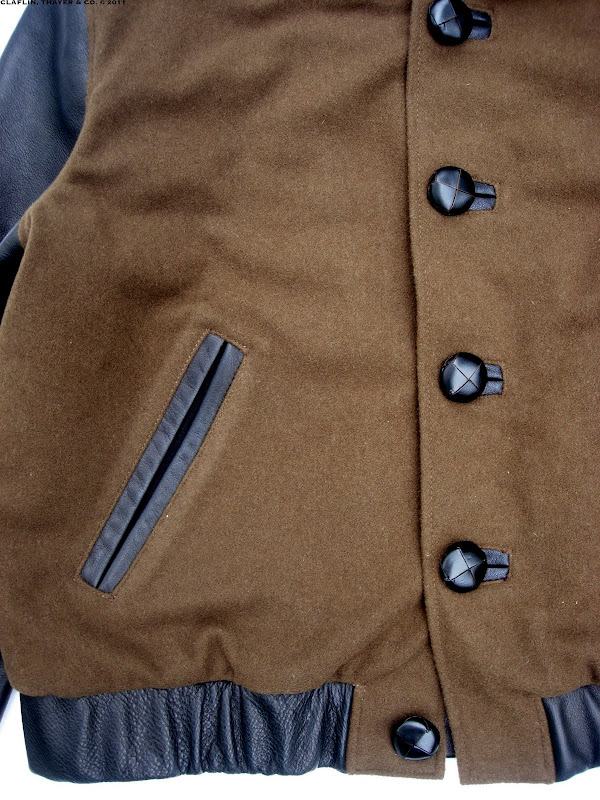
Kind of a long post here, so just skip ahead of you wanna see the final thing. I love varsity jackets - here's my version. You can see the inspiration HERE. Some quick drawings below. Traditional varsity jackets have snaps down the front but I really wanted to avoid using any metal trims for this jacket since I'm always so metal hardware-happy...love my zippers and buckles. I got some awesome leather buttons at the Pendelton mill in Oregon and I wanted to incorporate them for this style.
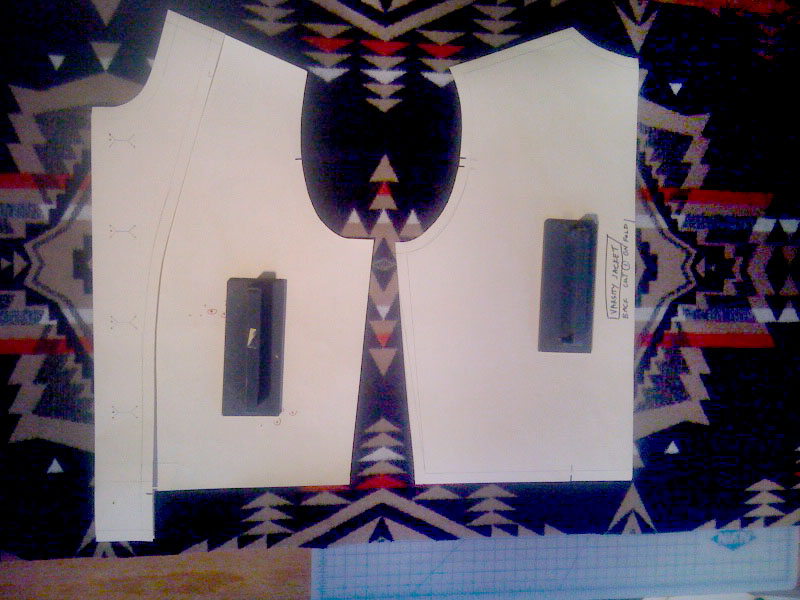
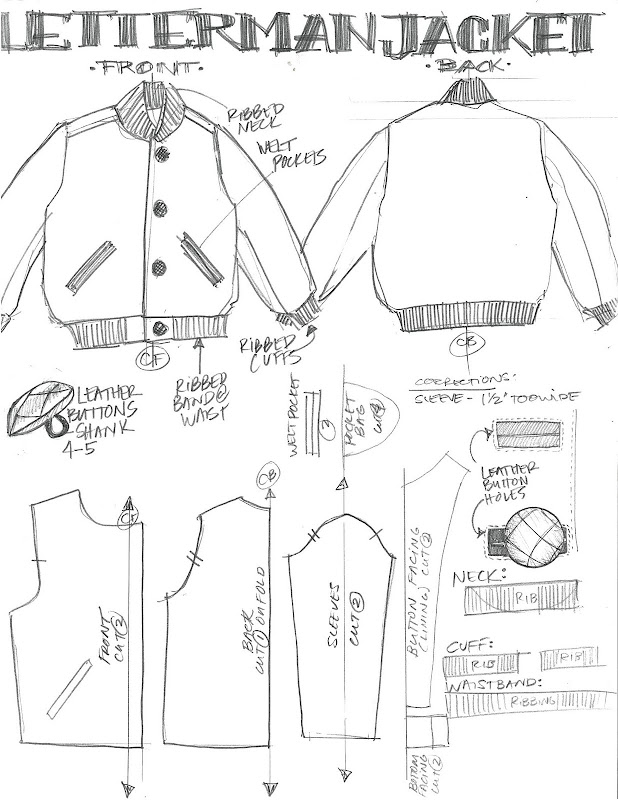 Pattern drafting.
 It's a very simple cut but there still ends up being a lot of pattern pieces.
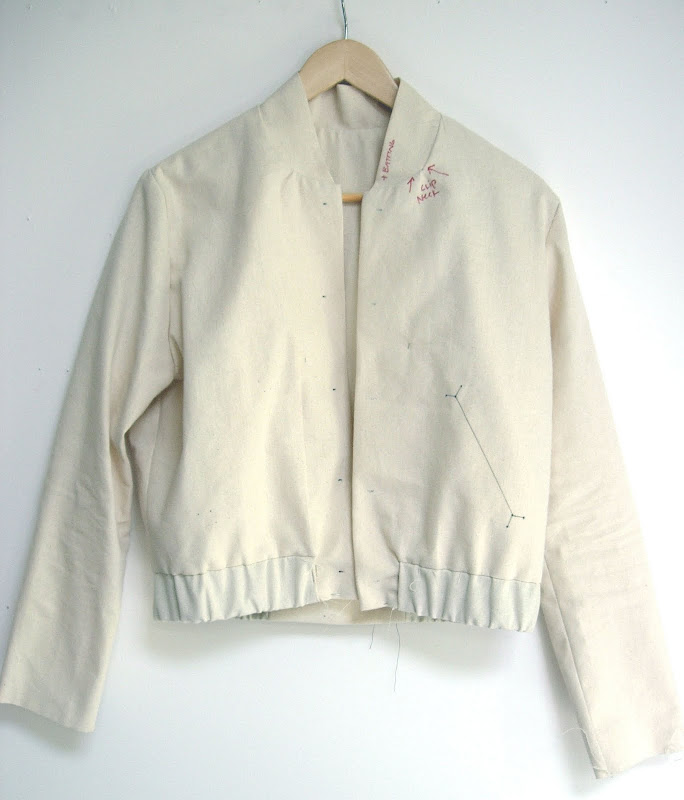
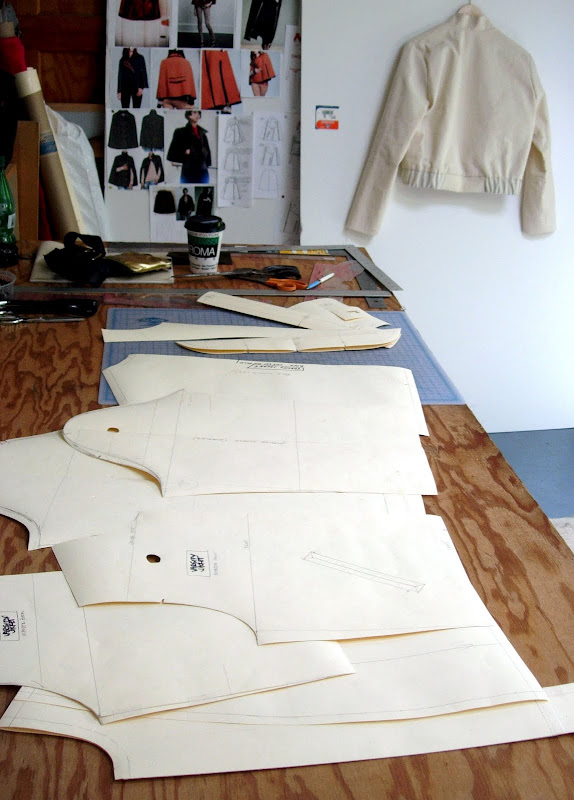 I sewed a canvas mock-up to make sure it fit right.
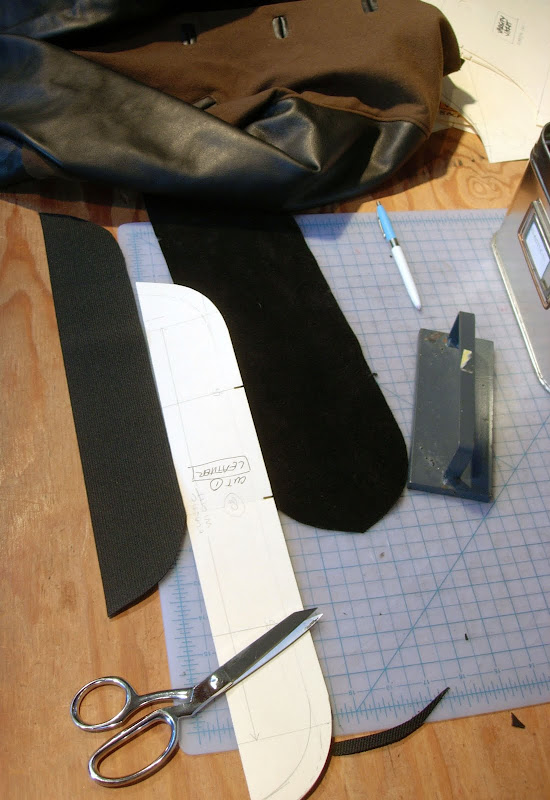
 I wanted to try something different - I had my heart set on leather button holes. I hate reading directions and following patterns which is really dumb of me, but I usually just mess around with something until I figure it out on my own. You learn a lot from trial and error. These button holes were a REAL BITCH. Still not 100% happy with the final outcome but I guess they look okay if you don't know anything about sewing, so don't look too close. Here's some practice versions.
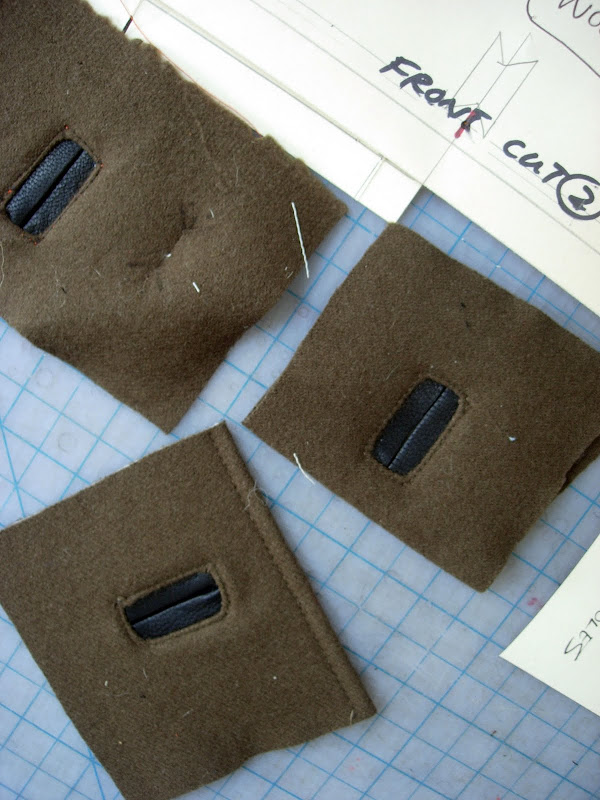 Self-portrait, with scissors. Those are my great, great grandmother's dressmaker's shears.
  Sewing it all up. I really wanted to use an old army blanket for the body but couldn't find one that was the right weight, so I bought some wool yardage. Everything else is black leather (sleeves, pockets, neck and waist ribbing, buttons, button holes).
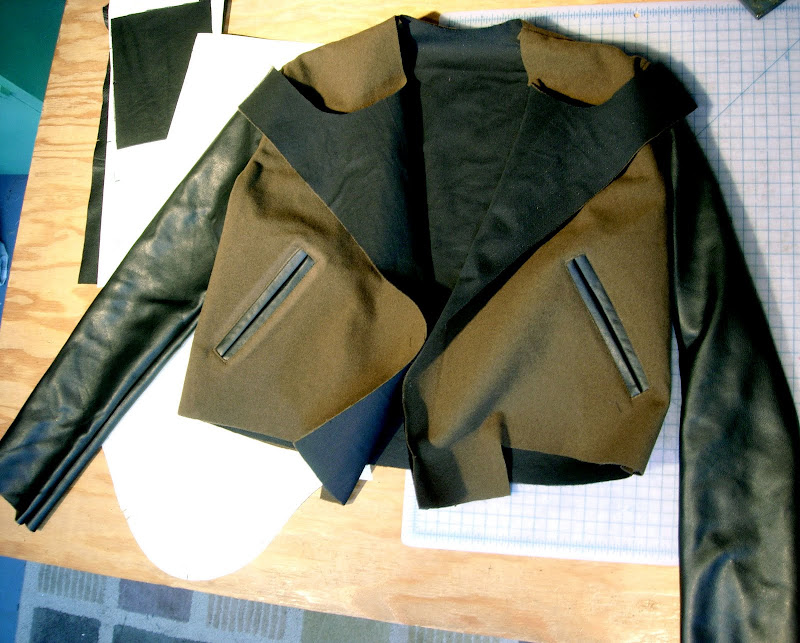 Mr. McFiddles, always underfoot even though there's no food here.
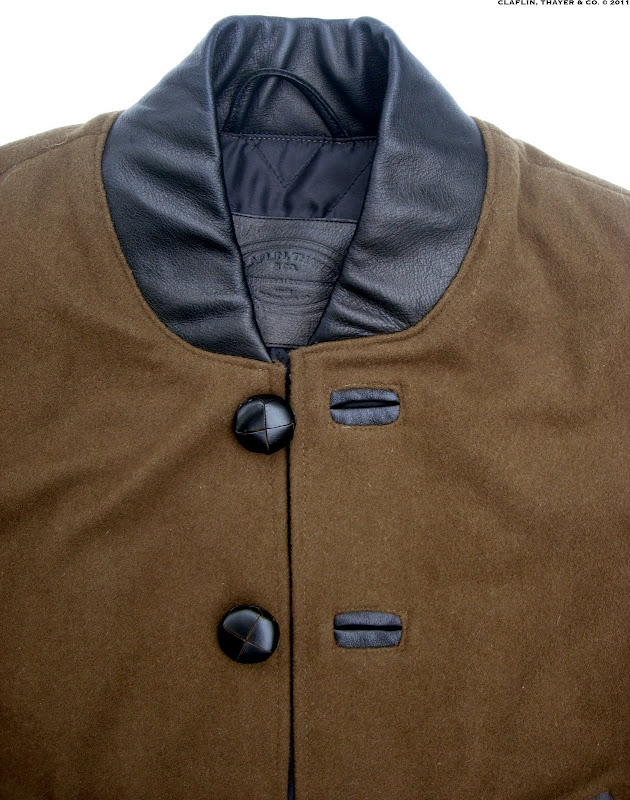
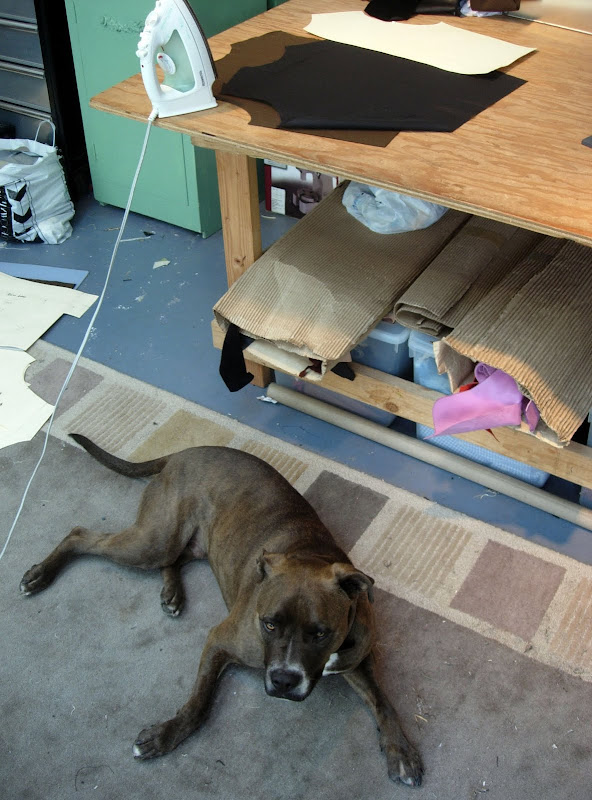 Making neck ribbing using leather and elastic. Totally not sure how this was going to turn out (ribbing is usually knit) but I crossed my fingers. I like it - but next time I'd increase the gathering ratio a little bit.
 About to sew the neck ribbing on. I use binder clips to hold my leather pieces together because pins bend and leave holes on the leather surface.
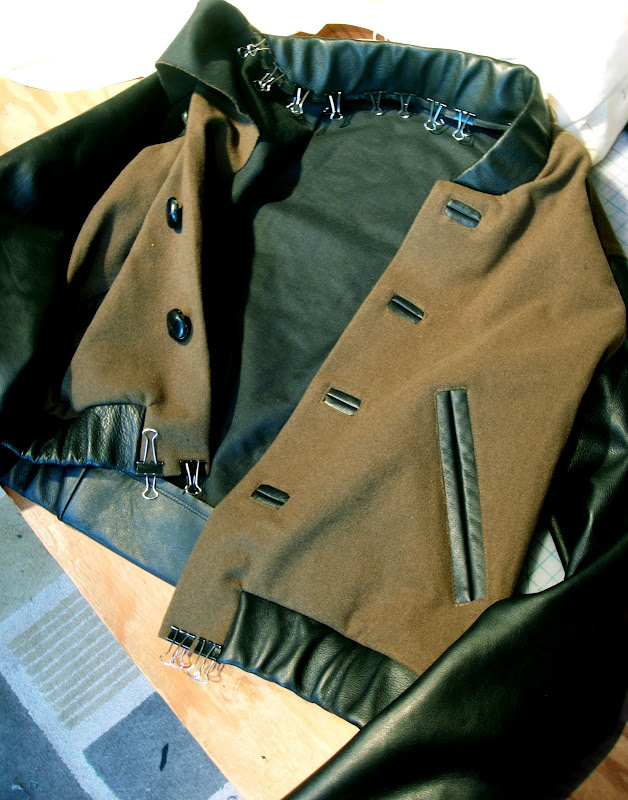 I really wanted to do a quilted lining...but not just boring old grid quilting. I made a zig-zag template on paper and pinned it to the batting and lining, following it as a guide while I sewed the layers together. The batting is very thin wool, so it's not bulky but still keeps you warm.
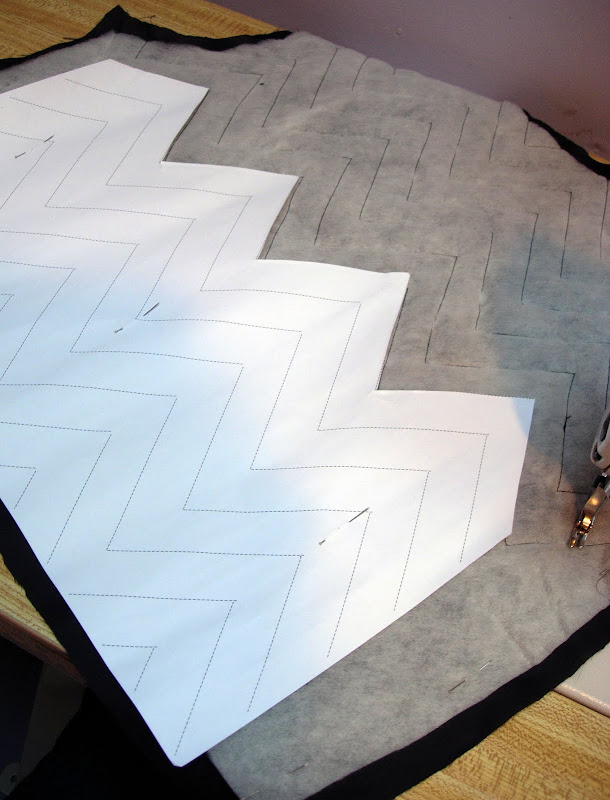 Finished jacket. But I still gotta put a button hole at the very bottom!
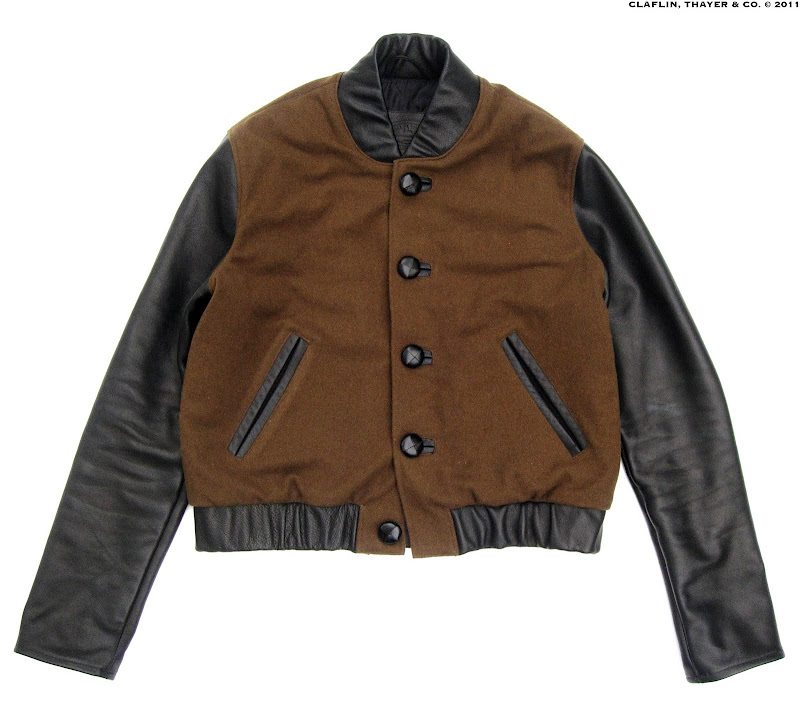
 See the zig zag lining? I'm very happy how it turned out. Grids are for squares!
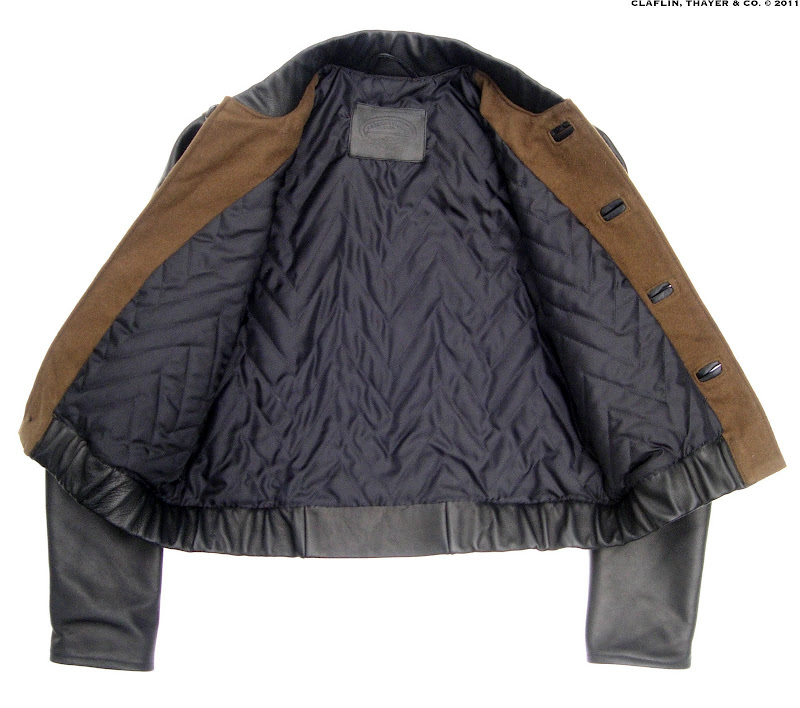
 Leather covered shank buttons, how I love you. I bet they've been making this same kind of button for 200 years. Guaranteed your grandpa has at least one jacket with those buttons on it.
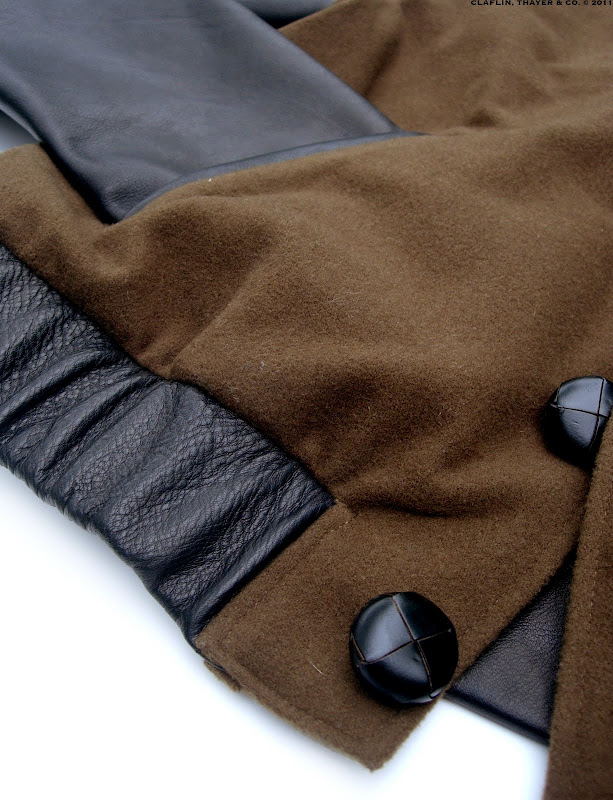
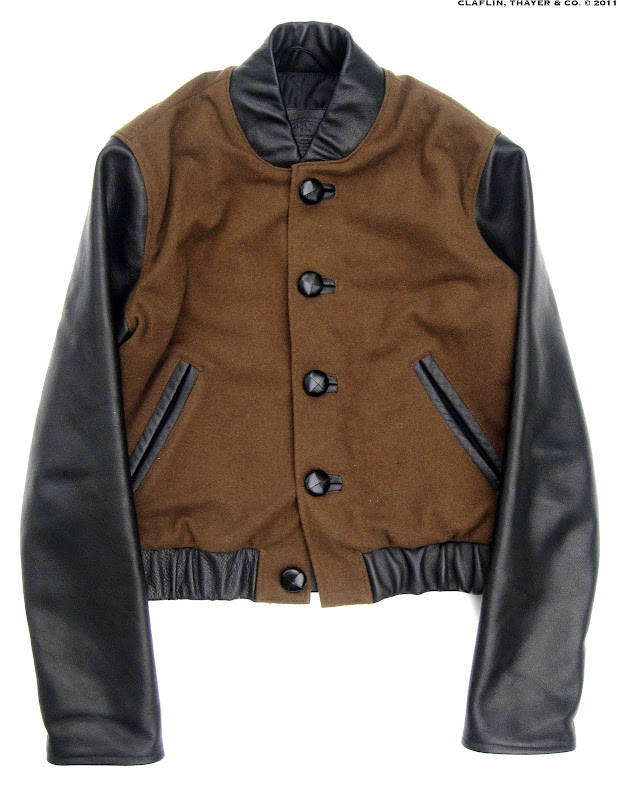

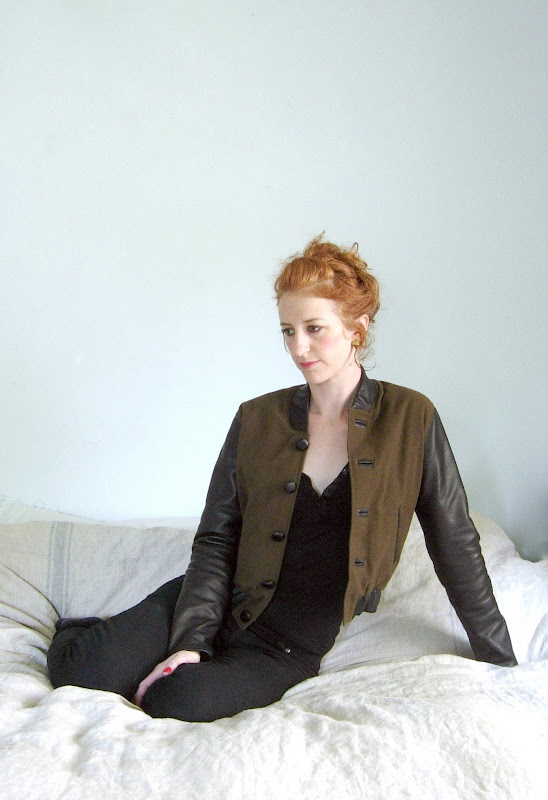
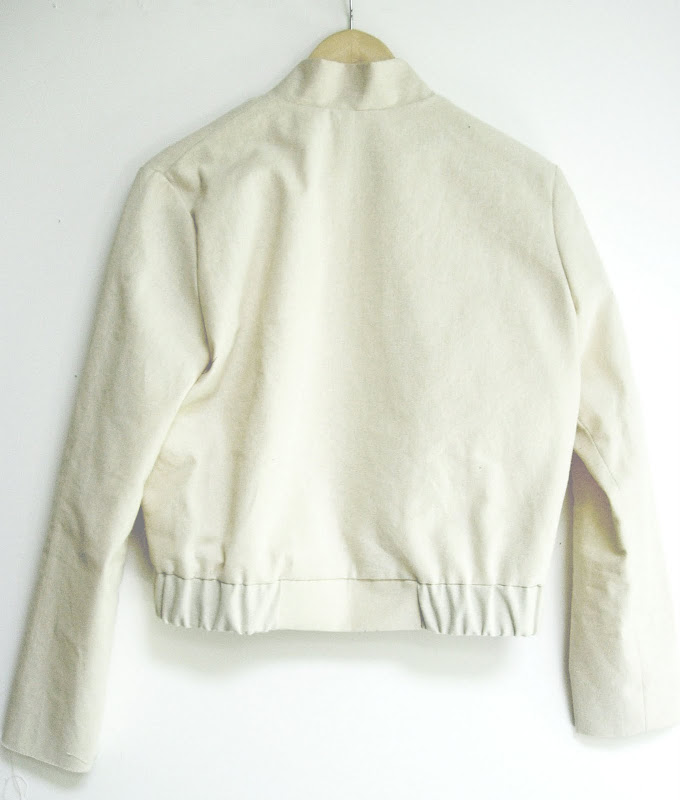
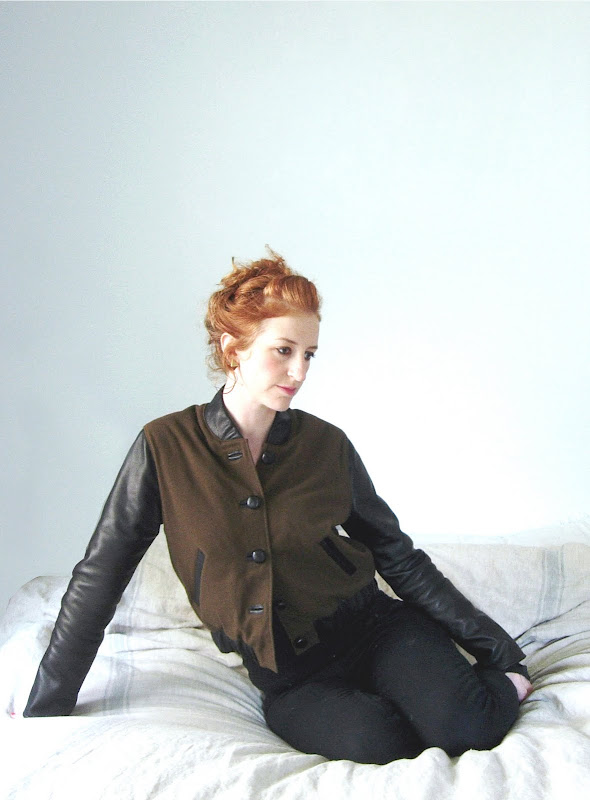 Fits like a glove, I'm going to wear it all the time.
Pattern drafting.It's a very simple cut but there still ends up being a lot of pattern pieces.I sewed a canvas mock-up to make sure it fit right.I wanted to try something different - I had my heart set on leather button holes. I hate reading directions and following patterns which is really dumb of me, but I usually just mess around with something until I figure it out on my own. You learn a lot from trial and error. These button holes were a REAL BITCH. Still not 100% happy with the final outcome but I guess they look okay if you don't know anything about sewing, so don't look too close. Here's some practice versions.Self-portrait, with scissors. Those are my great, great grandmother's dressmaker's shears. Sewing it all up. I really wanted to use an old army blanket for the body but couldn't find one that was the right weight, so I bought some wool yardage. Everything else is black leather (sleeves, pockets, neck and waist ribbing, buttons, button holes).Mr. McFiddles, always underfoot even though there's no food here.Making neck ribbing using leather and elastic. Totally not sure how this was going to turn out (ribbing is usually knit) but I crossed my fingers. I like it - but next time I'd increase the gathering ratio a little bit.About to sew the neck ribbing on. I use binder clips to hold my leather pieces together because pins bend and leave holes on the leather surface.I really wanted to do a quilted lining...but not just boring old grid quilting. I made a zig-zag template on paper and pinned it to the batting and lining, following it as a guide while I sewed the layers together. The batting is very thin wool, so it's not bulky but still keeps you warm.Finished jacket. But I still gotta put a button hole at the very bottom!See the zig zag lining? I'm very happy how it turned out. Grids are for squares!Leather covered shank buttons, how I love you. I bet they've been making this same kind of button for 200 years. Guaranteed your grandpa has at least one jacket with those buttons on it.Fits like a glove, I'm going to wear it all the time.JACKET#3 INSPIRATION
2 Comments
I finished my newest jacket this weekend and will post photos in the next week. I'm pretty happy with the result, even though I totally goofed a bunch along the way. Here's some inspirational images I used for direction.
Oh, Amy Winehouse...so sad she had to join the other 27s. But she did design a pretty cool jacket with Fred Perry that I really like a lot. So simple and neat.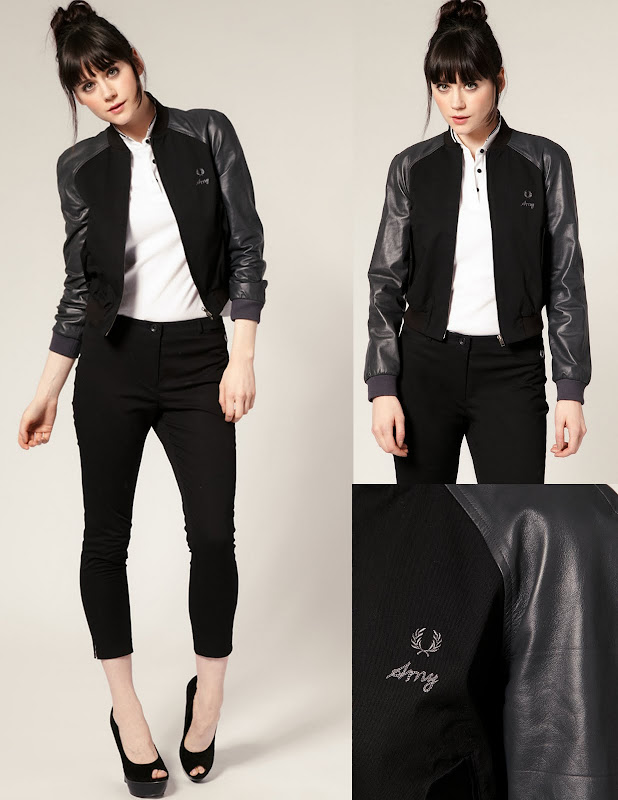 Love this vintage jacket. Boxy cut, contrast materials. Also like the neutral colors.
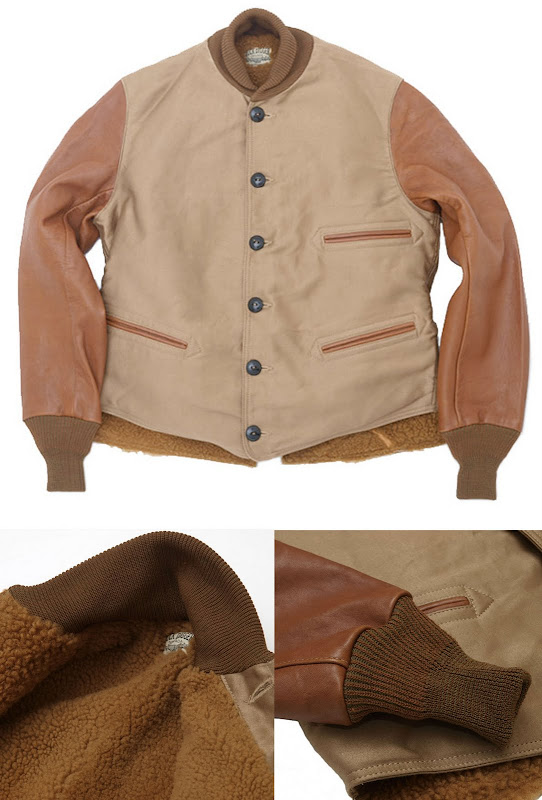
 Letterman/varsity styling. Love the wool body with contrast leather sleeves.
 Army green & black. It's a sharp combo.
 Stay tuned...
Oh, Amy Winehouse...so sad she had to join the other 27s. But she did design a pretty cool jacket with Fred Perry that I really like a lot. So simple and neat.
Love this vintage jacket. Boxy cut, contrast materials. Also like the neutral colors.Letterman/varsity styling. Love the wool body with contrast leather sleeves.Army green & black. It's a sharp combo.Stay tuned...
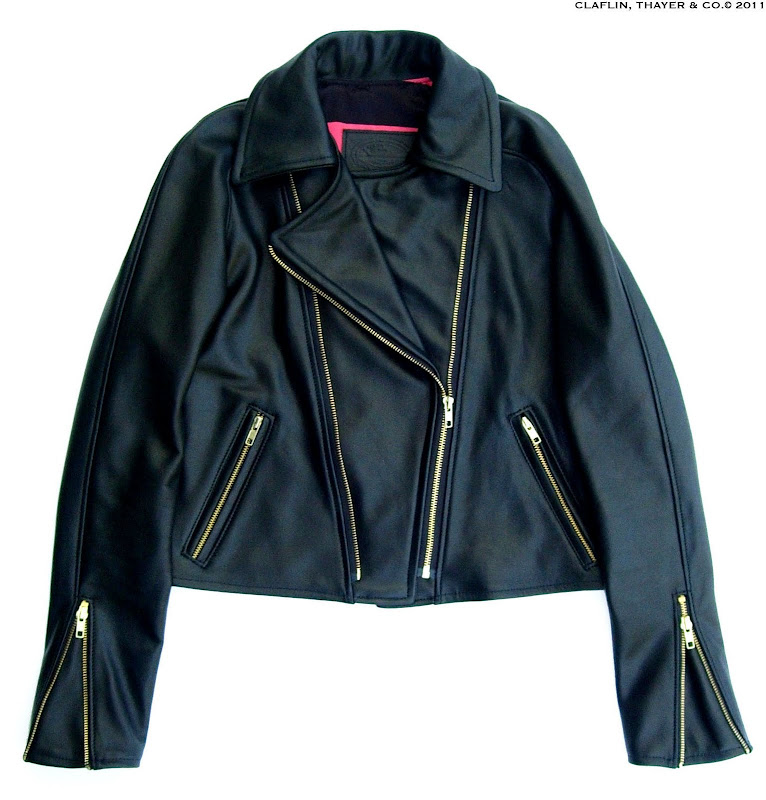
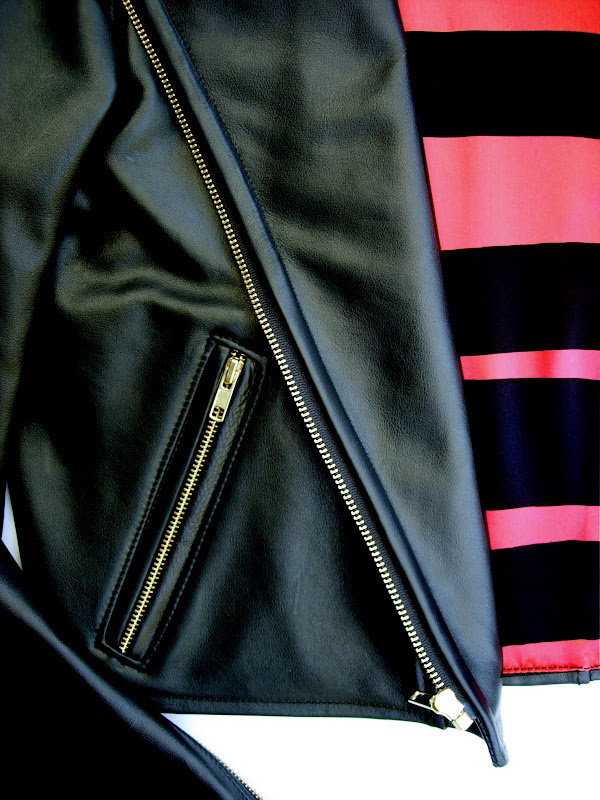
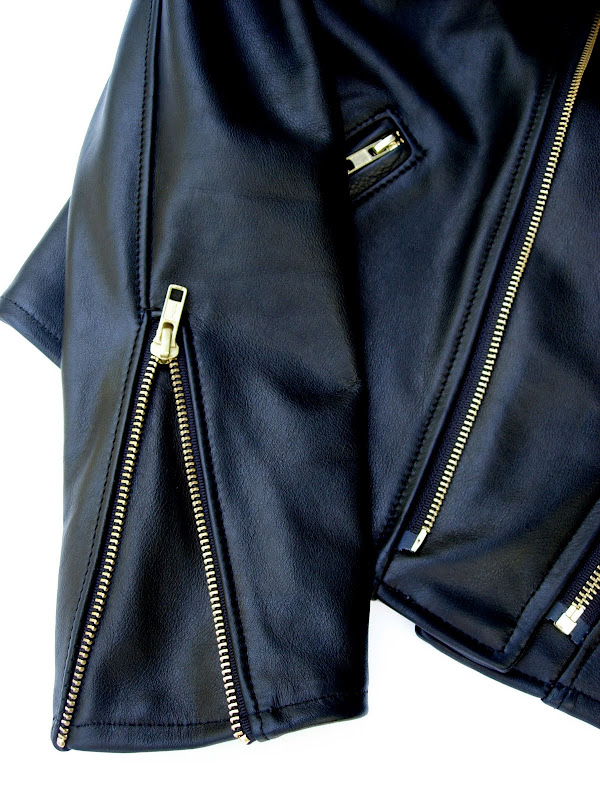
COMMISSION JACKET- KELLUCHI
3 CommentsMy most recent project was a commissioned jacket based off the first jacket pattern I made. This version has longer sleeves, a slightly less tapered fit through the waist, and an awesome irregular-striped pink & black silk lining. 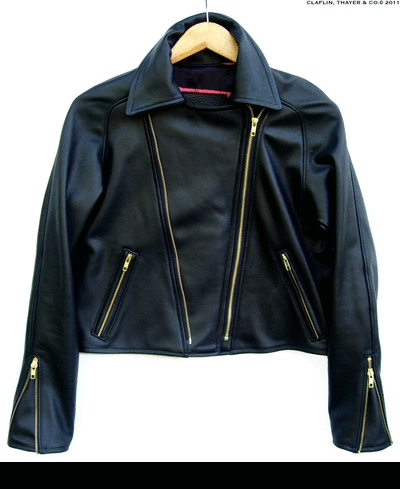
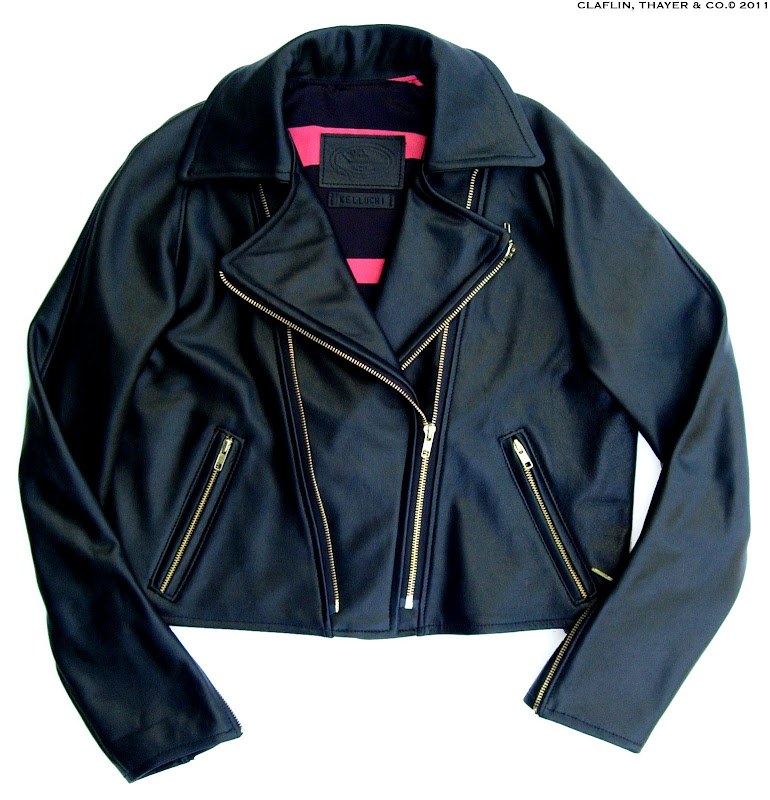
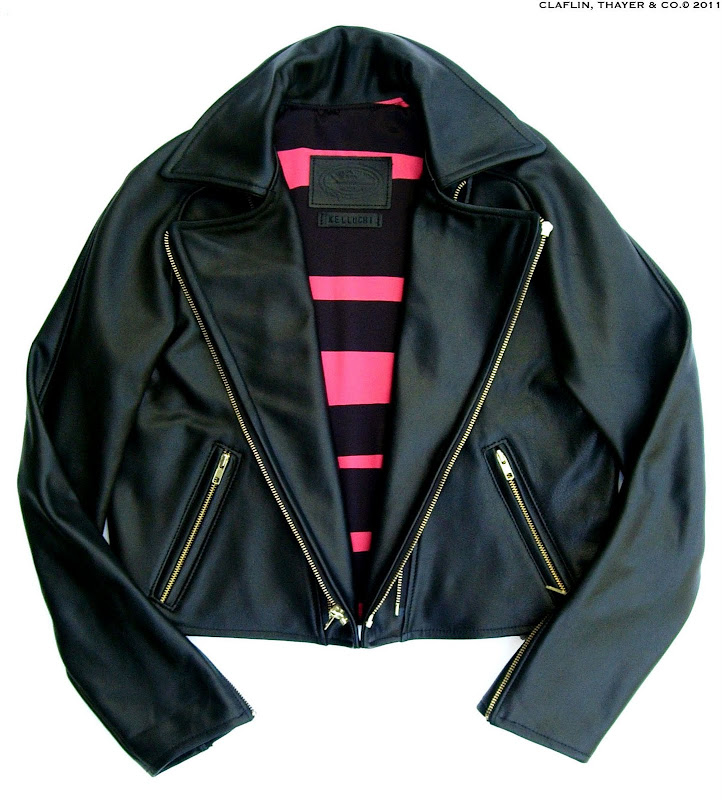
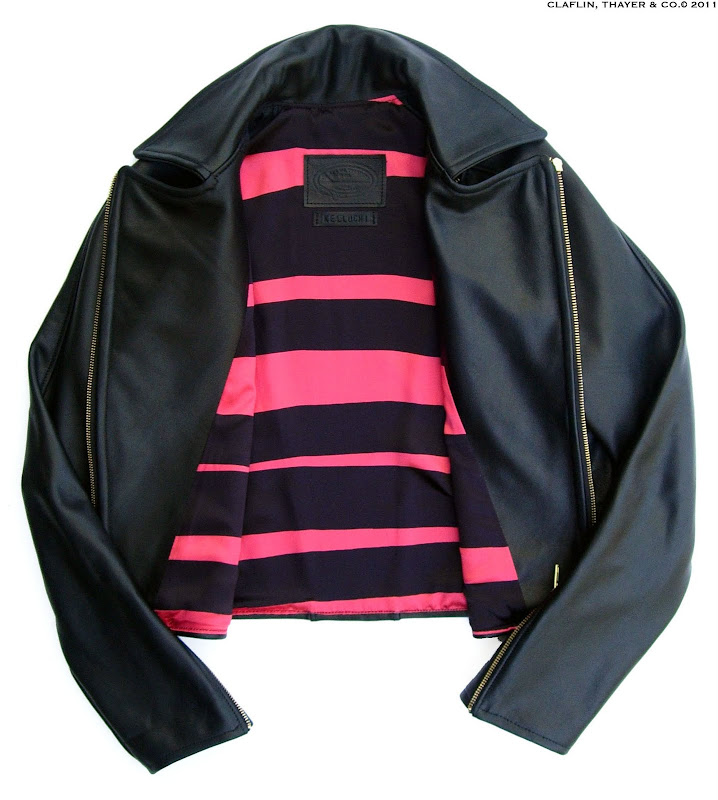
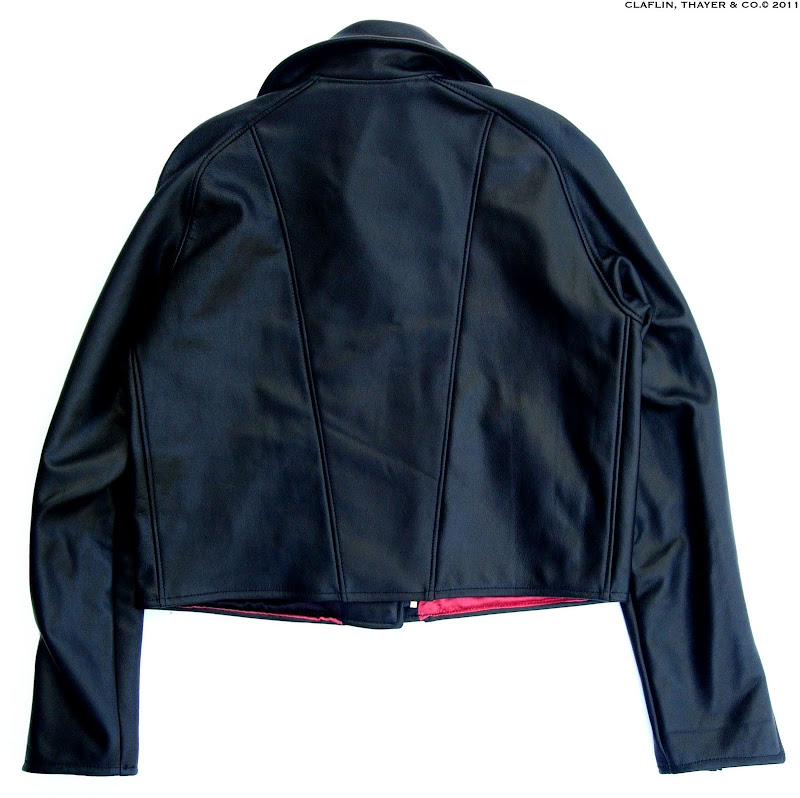
 For Kelluchi...she's so sassy she gets a name tag with her handle on it.
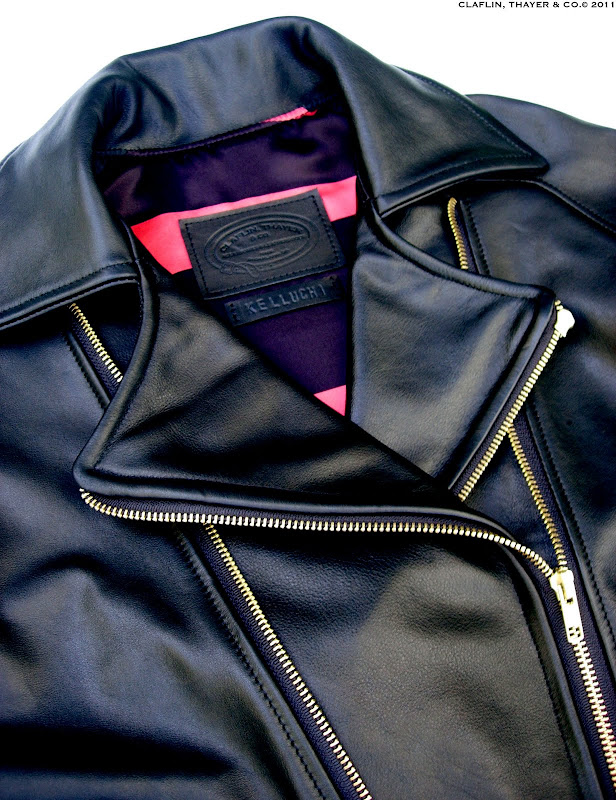
 I'm working on my newest pattern now - hoping to have my first version of that done to show in the next week or so.
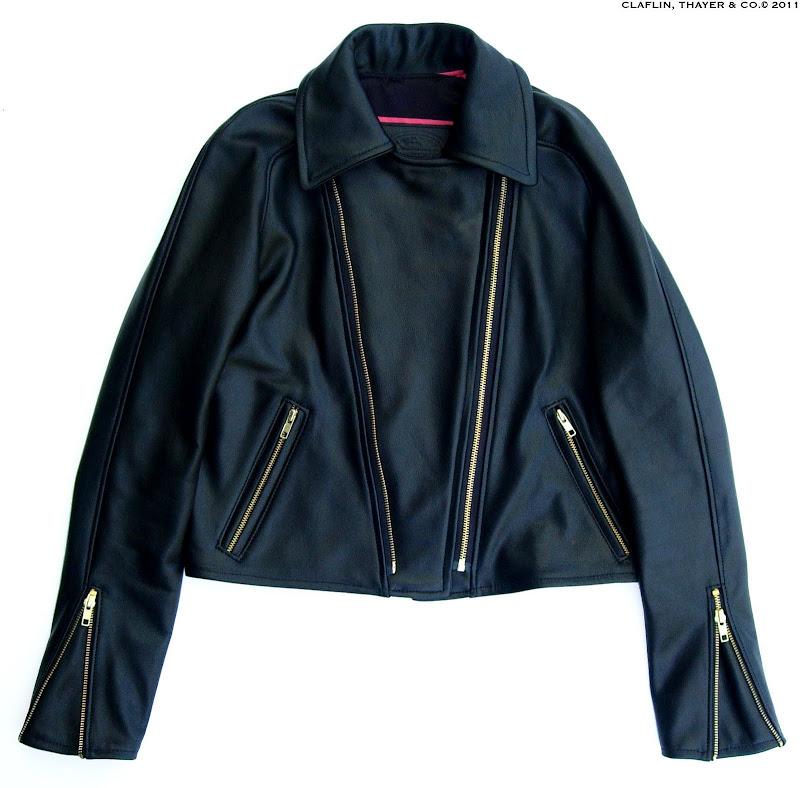
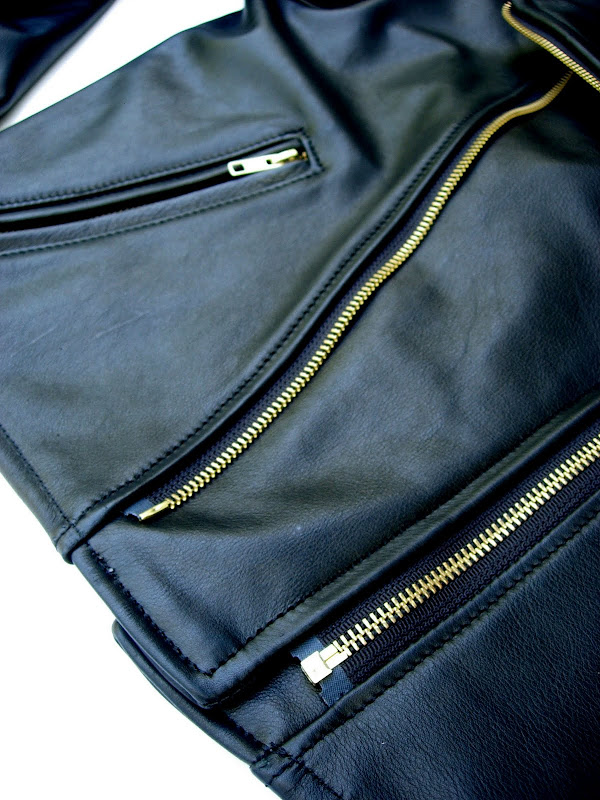
PEEK-A-BOO MOTO JACKET
Comment
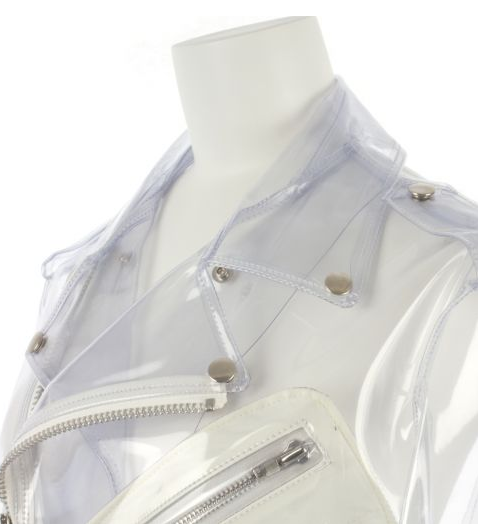
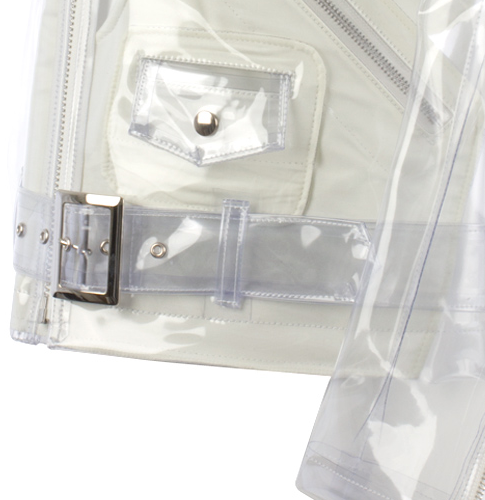
SCHOTT NYC - JACKET INSPIRATION
2 Comments
Schott is doing some very cool stuff lately, thanks to the new creative director Greg Chapman. Obviously I love the 2-tone brown/black combo:
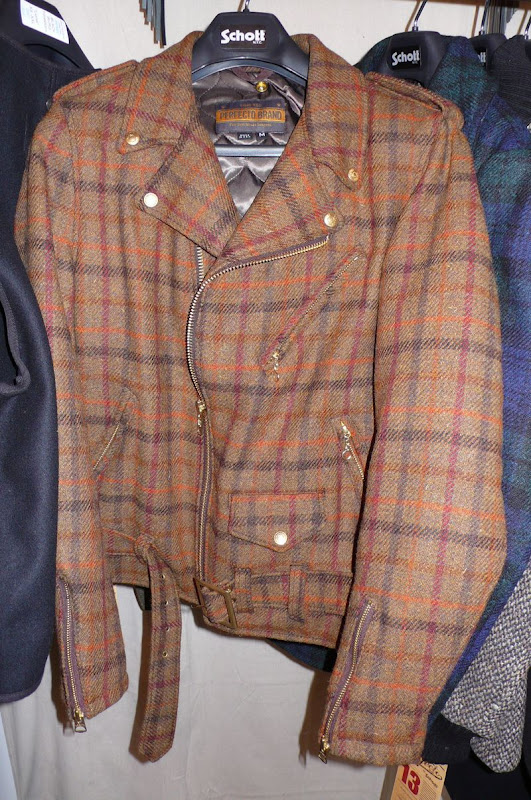
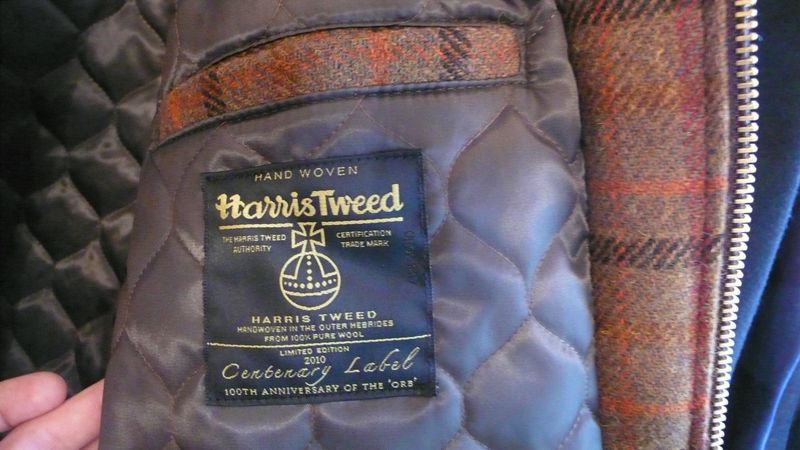
 Harris Tweed moto jacket. I'm going to visit the mill in Isle of Harris when I go to Scotland!
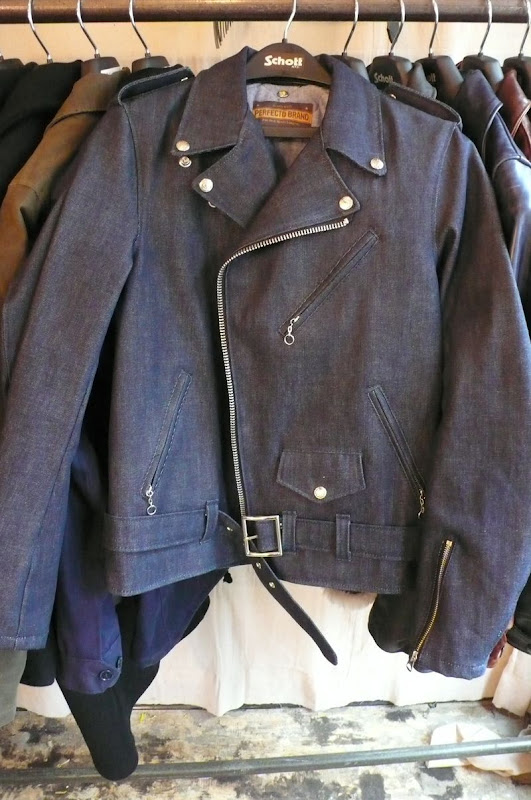
 Denim - I think this would wear in very well and look even better once it's all beat up.
 Jacket photos by Mister Mort
Harris Tweed moto jacket. I'm going to visit the mill in Isle of Harris when I go to Scotland!Denim - I think this would wear in very well and look even better once it's all beat up.Jacket photos by Mister MortSchott NYC x William Yan x We Are Not Pilgrims from Sam Sneed on Vimeo.
Watch the video to learn more about what Schott is up to. If anyone asked me what my dream job would be, this is basically it.JACKET #2
8 Comments
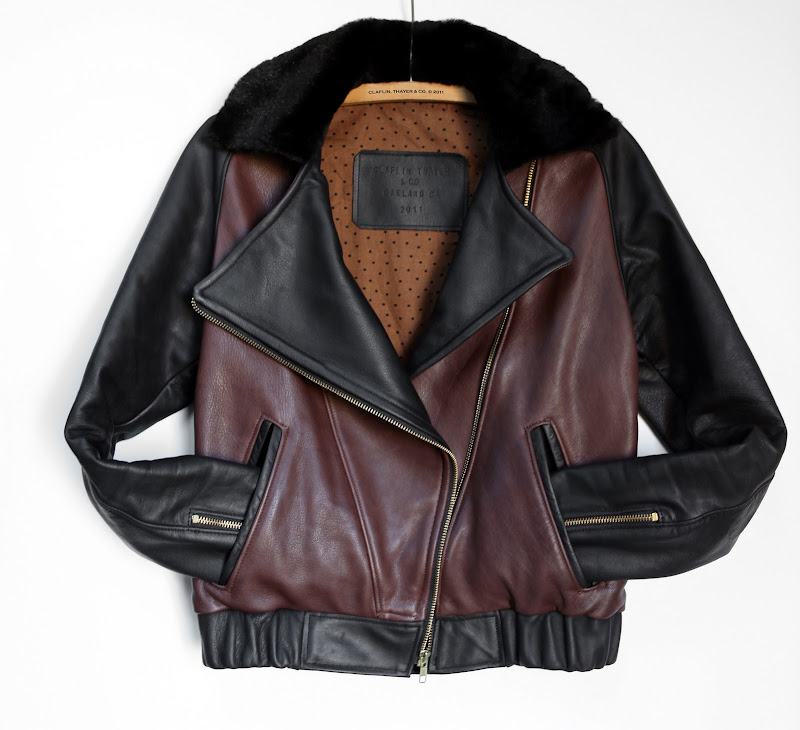
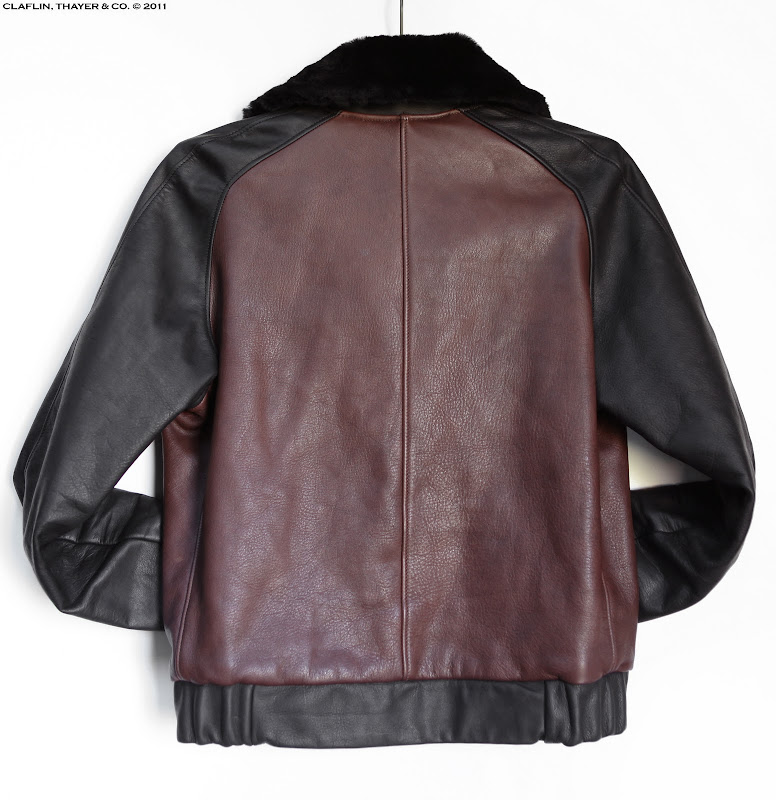
Here we go finally...lag zone on the blogular. I finished my second leather jacket about a month ago when it was nice and cold outside and I wanted something warm around my neck to fight off the chill. I'm loving the combo of brown and black and settled on a dark brown leather body with black sleeves. Click HERE to revisit the inspiration.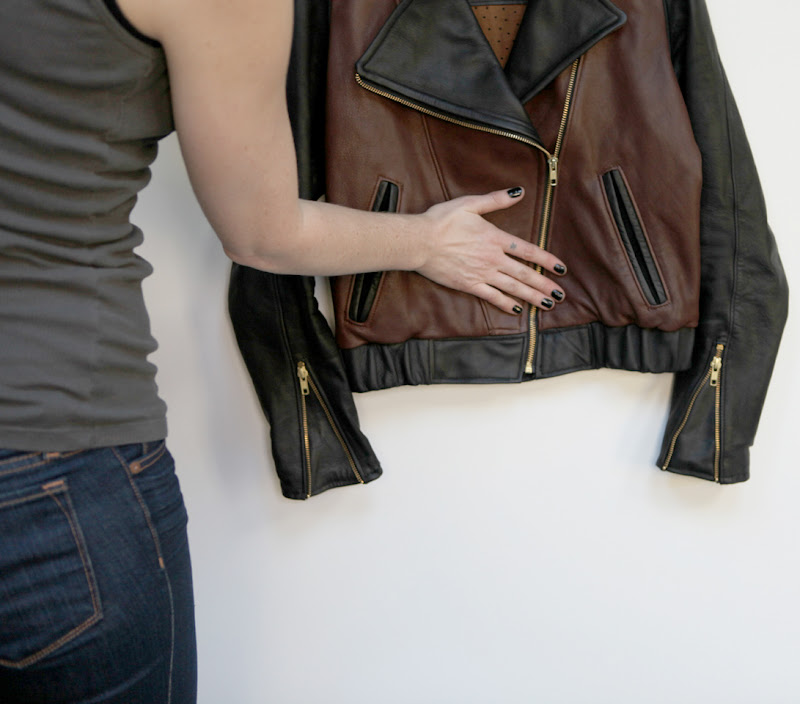 Jacket #2 is a modified pattern of my first jacket, seen HERE. Sketches of the modified version below:
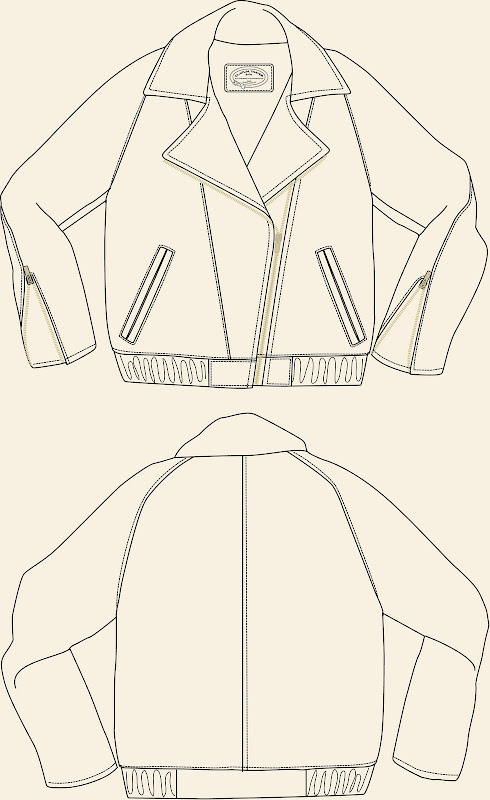 For Jacket #2, I made the sleeves longer, changed the waist to a leather casing with elastic, and added a nice sherpa collar for warmth.
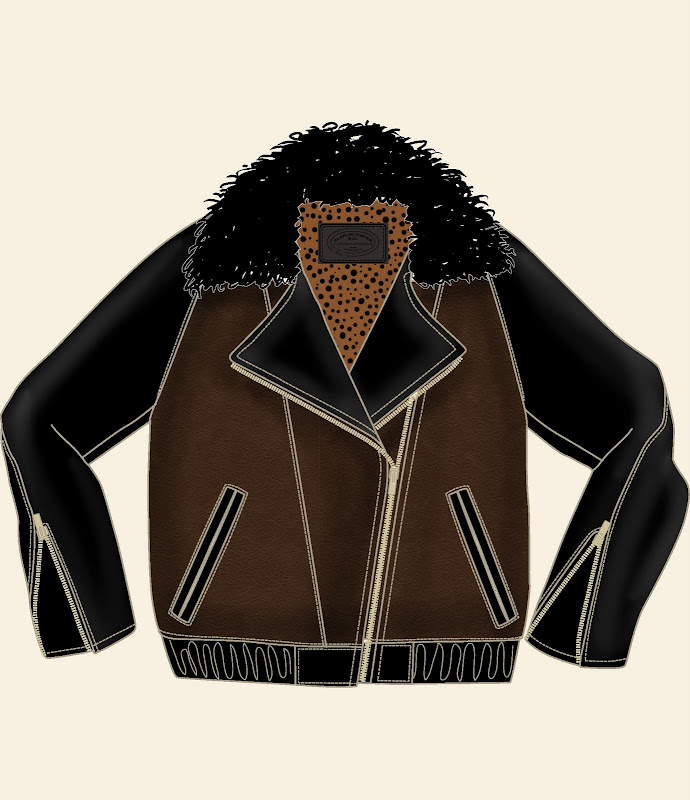 Sewing the lining.
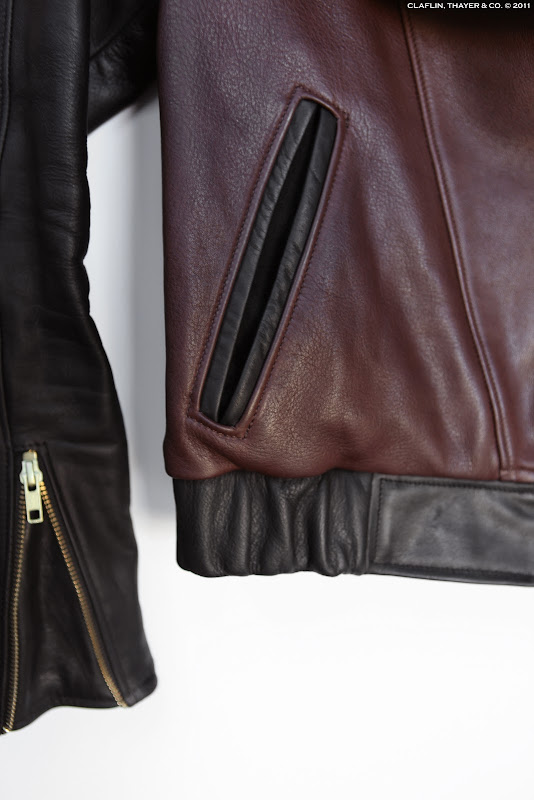
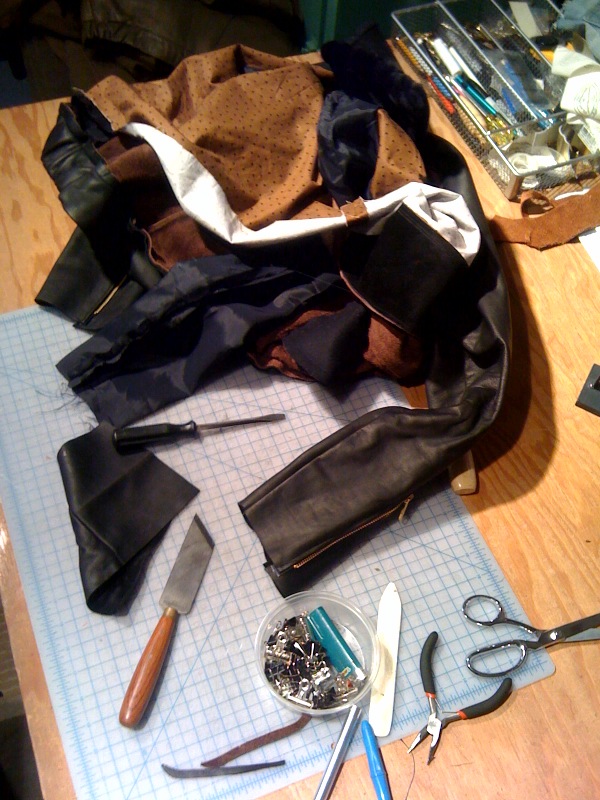 Welt pockets are lined with wool to keep your hands warm.
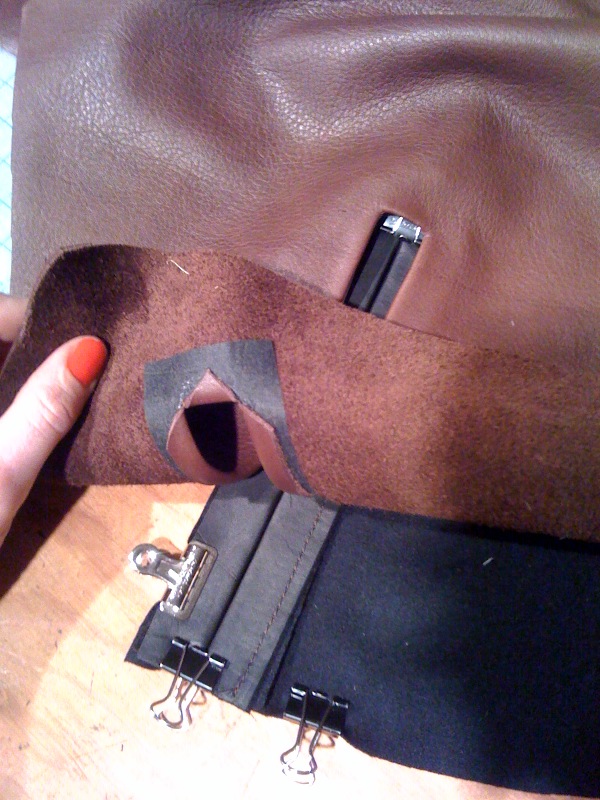 Fur can be a total pain in the ass to work with. Here I am cutting away the fur pile from the skin at the seam allowance. This is necessary to do, otherwise the seams will turn out bulky and unflattering. This is a messy step and I should really wear a mask, but I'm lazy.
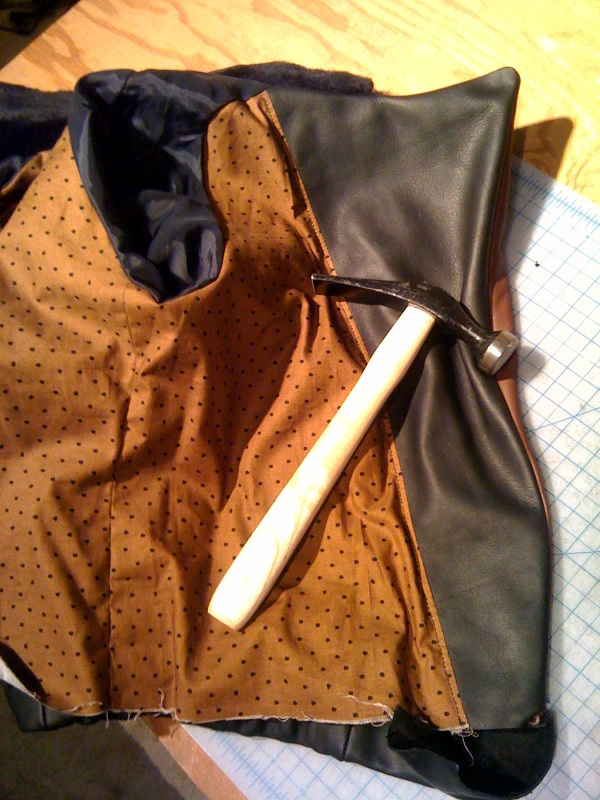
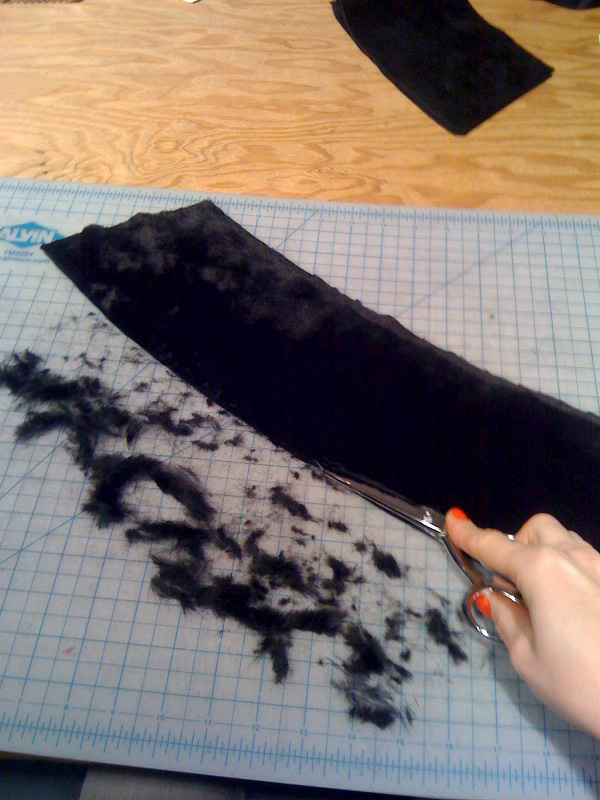 After sewing the lining to the jacket, I'm trimmed the seams and turned the jacket right side out. I hammered all of the seams with my nice leather hammer to make them lay flat.
 I wish I had made a larger shawl-type collar, as mocked-up below. I ended up sewing a basic turned collar, but I think a larger collar would have been nice. Next time. You learn as you go.
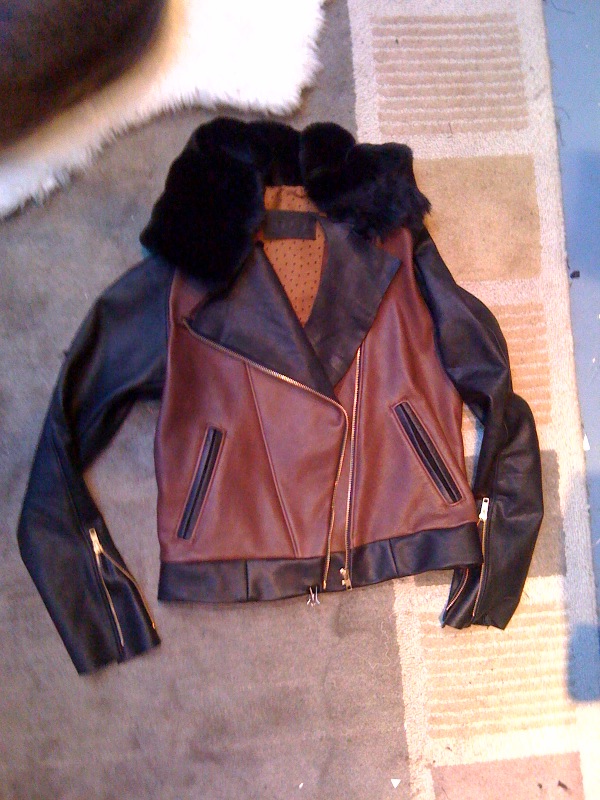 All done. I'm happy with it overall but kept a list of improvements for next time.
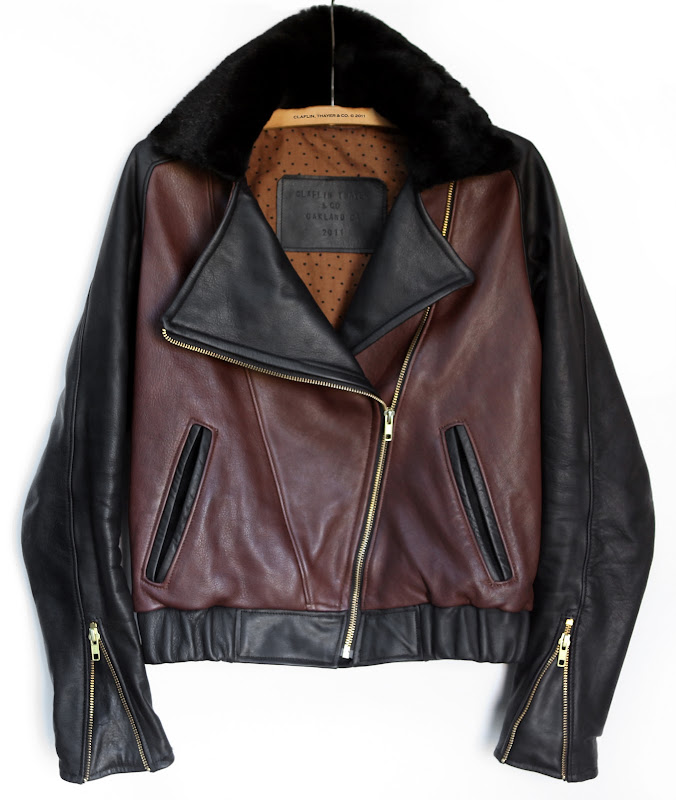

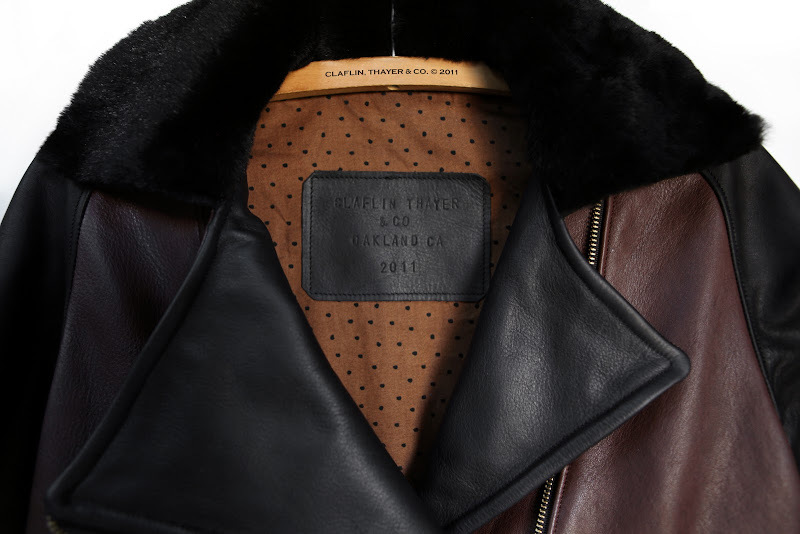 Thanks to Becca for snapping some photos and being a rad studio-mate.
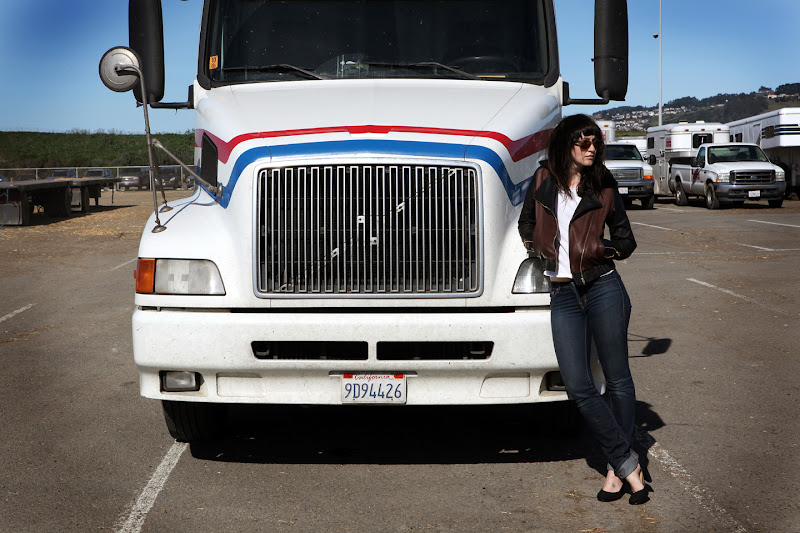

Jacket #2 is a modified pattern of my first jacket, seen HERE. Sketches of the modified version below:For Jacket #2, I made the sleeves longer, changed the waist to a leather casing with elastic, and added a nice sherpa collar for warmth.Sewing the lining.Welt pockets are lined with wool to keep your hands warm.Fur can be a total pain in the ass to work with. Here I am cutting away the fur pile from the skin at the seam allowance. This is necessary to do, otherwise the seams will turn out bulky and unflattering. This is a messy step and I should really wear a mask, but I'm lazy.After sewing the lining to the jacket, I'm trimmed the seams and turned the jacket right side out. I hammered all of the seams with my nice leather hammer to make them lay flat.I wish I had made a larger shawl-type collar, as mocked-up below. I ended up sewing a basic turned collar, but I think a larger collar would have been nice. Next time. You learn as you go.All done. I'm happy with it overall but kept a list of improvements for next time.Thanks to Becca for snapping some photos and being a rad studio-mate.